The Correct Way to Hang Curtains for a Designer Look

Learning the correct way to hang curtains is a game-changer for your home. The secret is to mount the rod high and wide—usually about 4-6 inches above the window frame and 3-6 inches past it on each side. This one trick empowers you to make windows look bigger and ceilings feel taller, instantly upgrading the look of the whole room.
Why Your Curtain Placement Changes Everything
Have you ever walked into a room and it just felt right? Polished, elegant, and inviting? Chances are, the window treatments had a lot to do with it. This is an element that can make or break your design, but it’s so often overlooked. Hanging curtains isn’t just about blocking the sun; it’s about framing your view and giving you the power to play with the room's proportions.
When curtains are hung incorrectly, they can make a space feel small and dated. A rod placed right on the window frame, for instance, visually shrinks the window and blocks a surprising amount of natural light. This guide will give you the tools and knowledge to avoid that common pitfall and achieve a pro-level finish all on your own.
The "High and Wide" Illusion
The core principle that interior designers use is the 'high and wide' method. Lifting the rod above the frame and pushing it outwards creates a much more dramatic, intentional look.
- Taller Ceilings: When you hang the rod closer to the ceiling, it naturally draws your eye upward. This simple shift creates the illusion of more height and airiness in the room.
- Wider Windows: Extending the rod beyond the window frame means that when you pull the curtains open, the panels rest on the wall instead of bunching up over the glass. This exposes the entire window, lets in maximum light, and makes the window itself seem much grander.
This is your secret weapon. You're using fabric to redraw the proportions of your room, creating a sense of luxury and openness without knocking down a single wall.
Of course, the curtains themselves play a huge role in defining a room's character. You can understand various interior design styles to ensure your window treatments feel like a natural part of your home's aesthetic.
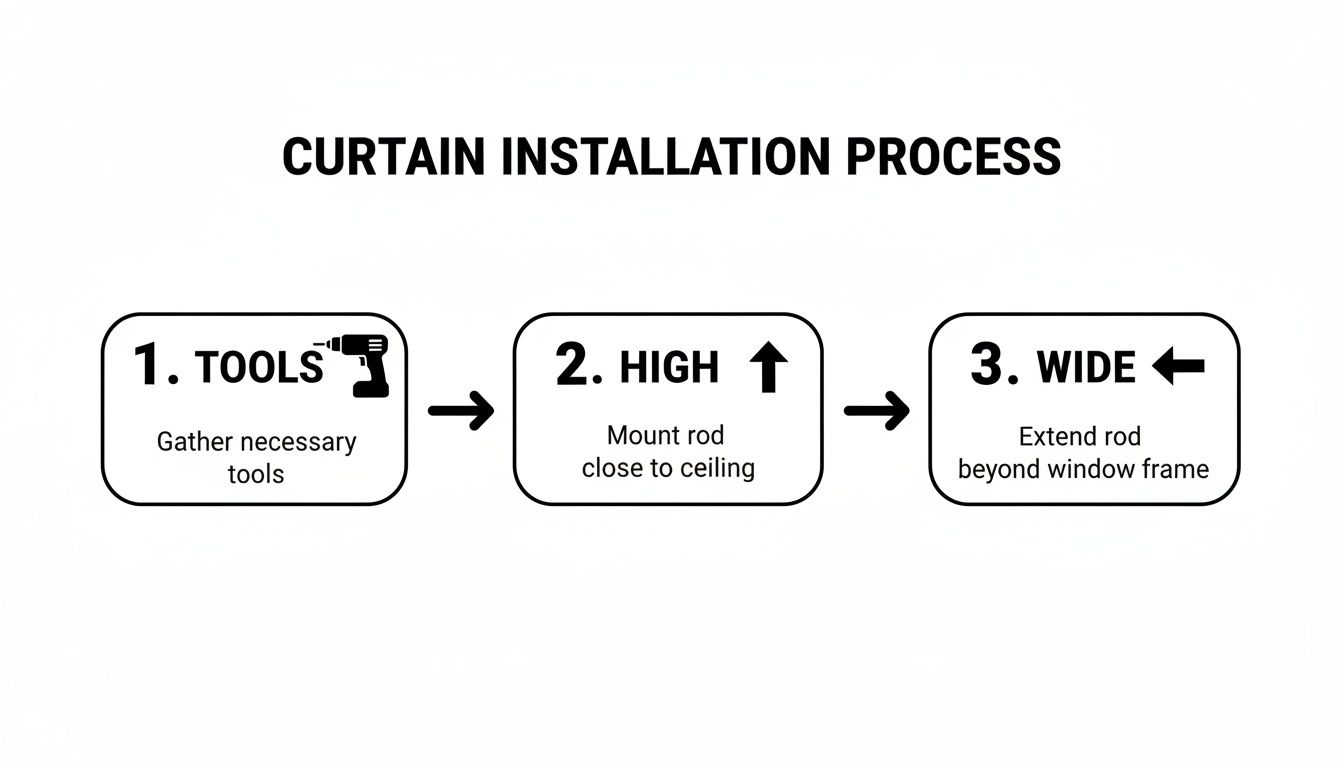
Gather Your Tools for Success
Before you start drilling, take a moment to gather the right gear. A little preparation makes the entire process smoother and guarantees a perfect result. Think of this as your toolkit for mastering your design.
Here’s what you’ll need:
- A reliable tape measure
- A pencil for marking your spots
- A level (this is the key to avoiding a crooked rod!)
- A drill with the right-sized bits
- Wall anchors and screws (your curtain rod kit should include these)
With these tools in hand, you're all set to transform your space. Let’s get to it.
Getting Your Measurements Right for a Flawless Fit
When it comes to hanging curtains, precision is your superpower. Let's toss out the old idea of just measuring the window frame itself. A professional designer looks at the entire wall as a canvas, and getting your measurements right is the first step to achieving a truly custom, high-end look.
First up is your curtain rod length. The secret to making your room feel bigger and brighter is to mount your rod wider than the actual window. This gives your curtains a place to "stack back" on the wall when they're open, letting every bit of natural light flood into the room.
Next, you need to think about fullness. This is where so many people go wrong. Flat, skimpy curtains just don't have the same impact as drapes with rich, luxurious folds. Having enough fabric is what creates that beautiful, voluminous look, even when the curtains are fully closed. It's a key reason the global curtains market is projected to hit USD 19,365.2 million by 2030—homeowners are discovering how these details make a world of difference. To get that coveted designer look, you'll want the total width of your curtain panels to be 1.5 to 3 times the width of your window.
Finding Your Ideal Rod Width
Let's nail down that rod width. Grab your tape measure and get the horizontal width of your window, making sure to include the trim or casing in your measurement.
- Now, add 6 to 12 inches to that number.
- This gives you an extra 3 to 6 inches on each side of the window frame.
For instance, if your window is 50 inches wide, you're looking for a rod that’s somewhere between 56 and 62 inches long. This extra space is crucial for allowing the curtains to frame the window beautifully instead of blocking it.
Getting these initial numbers right is just as vital as when you learn how to properly measure furniture for a room; it’s all about empowering you to achieve a perfect, functional fit.
This simple "high and wide" philosophy is a game-changer for making any room feel more grand and thoughtfully designed.
Choosing the Perfect Curtain Length
Now for the final decision: how your curtains will meet the floor. This single choice can define the entire mood of your space, steering it from casual and practical to formal and dramatic. You've got three classic options.
Pro Tip: The "kiss" is often the go-to for a tailored, high-end look, but it demands very precise measuring. If you're looking for something a bit more forgiving but still incredibly chic, the "float" is a fantastic choice for your home.
- The Float: Here, the hem hovers about a half-inch above the floor. It's a clean, crisp look that's super practical, especially if you have kids or pets running around. It also makes vacuuming a breeze.
- The Kiss: This is where the curtain panel just skims the surface of the floor. It’s an elegant and intentional style that screams "custom," but you have to measure from the rod to the floor with dead-on accuracy.
- The Puddle: For a truly romantic or dramatic statement, let the fabric pool 1 to 3 inches onto the floor. This style works best with heavier, more luxurious fabrics like velvet or linen that drape beautifully.
With these key measurements in hand, you're ready to choose curtains and hardware with confidence.
Choosing Hardware That Elevates Your Design
Think of your curtain hardware as the jewelry for your room. It’s so much more than just a metal pole to hold up your drapes. The right rod, finials, and rings are powerful design tools that pull the entire space together, reinforcing your home's unique style.
Your first decision is the rod type. A single, streamlined rod works beautifully for a clean, modern aesthetic. But if you’re after that layered look—think sheer curtains for daytime privacy and heavier drapes for nighttime—a double rod is your best friend. This setup gives you ultimate control over both light and ambiance.
Selecting the Right Rod Diameter and Finish
One of the biggest mistakes you can make is choosing a rod that’s too thin for the window or too flimsy for the curtains. A sagging rod instantly cheapens the whole look.
Here's a solid rule of thumb: for any window wider than 60 inches, you'll want a rod that's at least 1 inch in diameter. Just as important, make sure it comes with a center support bracket. Without it, even a sturdy rod will eventually bow under the weight.
The finish on your hardware is another chance to create a really cohesive feel. A brushed gold rod can pick up the tones in your cabinet pulls or lighting, while matte black offers a bold, contemporary contrast. It's these small, coordinated details that make a space feel polished and intentional. If you need some ideas, exploring how to use metal accents in your decor can spark some great inspiration for choosing the perfect finish.
Expert Tip: Your curtain rod creates a strong horizontal line that draws the eye. Choosing a sturdy, stylish option, like a Signature Design by Ashley Curtain Rod, provides the reliable and beautiful foundation your window treatments deserve.
Adding a Personal Touch with Finials
Don't forget the finials! These are the decorative end caps on your rod, and they're the perfect place to inject a little personality. A simple cap keeps things minimalist, while an ornate glass or geometric finial can become its own subtle focal point.
- For a modern look: Stick to simple, clean-lined finials like flat end caps or small cylinders.
- For a traditional or transitional space: Classic ball, urn, or more detailed shapes work beautifully.
- For a touch of glam: Look for crystal or metallic finials to add a hint of sparkle and elegance.
Choosing the right hardware is a critical part of hanging curtains correctly, turning a functional necessity into a true design statement.
Putting It All Up: A Guide to Flawless Installation
Alright, you've done the prep work. You have your measurements, you've picked your hardware, and now comes the fun part. This is where all that planning pays off, turning your vision into a real, tangible result that looks professionally done.
Getting this part right is what separates a so-so window treatment from a stunning one. It’s less about just drilling holes and more about precision and a steady hand.
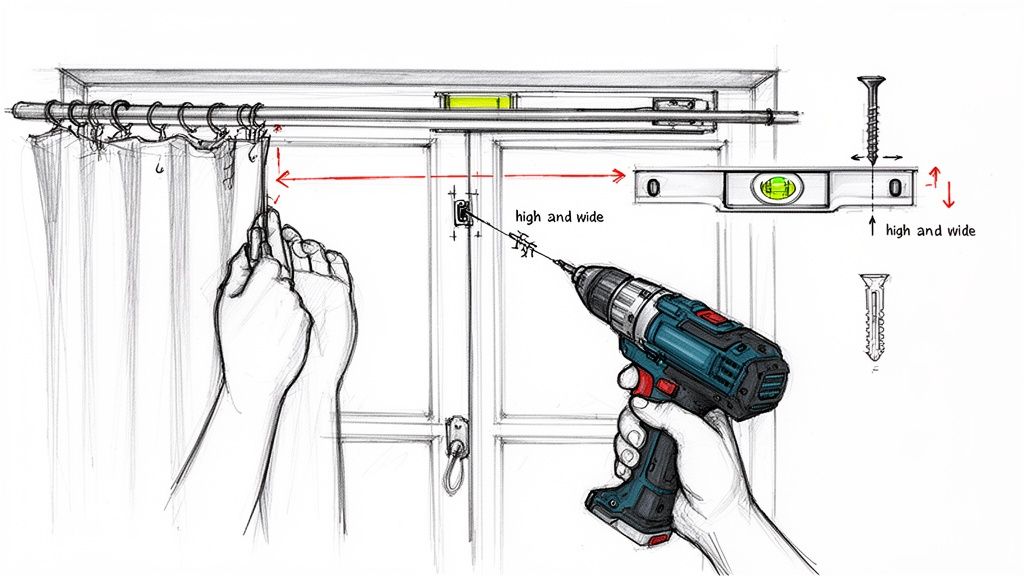
Pinpointing Your Bracket Placement
Time to grab your pencil, tape measure, and that all-important level. Remember the "high and wide" measurements you took? Let's put them to use. First, measure up from the top of the window frame—usually 4-6 inches is a good starting point—and make a light pencil mark.
From that mark, place your level against the wall and draw a faint, perfectly straight line extending out toward the side. Then, measure out from the side of the window frame, typically 3-6 inches, along that level line. The spot where they intersect? That's exactly where your first screw will go. Do the same on the other side, and then double-check with your level to be absolutely certain the two marks are even.
I can't stress this enough: a crooked rod is the number one giveaway of a DIY job. It throws everything off. Take an extra minute with your level; it’s your best friend for getting that polished, professional look.
Getting the Brackets on the Wall
Here's where a little know-how makes a huge difference. The goal is to anchor your brackets securely, and that all depends on what’s behind the drywall. If you're lucky, your mark will fall on a wall stud. If so, you can drill your screw right in for a rock-solid hold.
More often than not, you'll be drilling into hollow drywall. In this case, using wall anchors is not optional.
- First, drill a small pilot hole that’s just a tiny bit smaller than your anchor.
- Next, tap the anchor in with a hammer until it sits flush against the wall.
- Finally, position your bracket over the anchor and drive the screw in. You’ll feel it tighten up for a secure fit.
This is a critical safety step. The market for drapery hardware is booming—projected to hit USD 3.2 billion by 2028—because good, reliable hardware matters. You can learn more about the growing curtain and hardware market trends in this industry report. Properly installed brackets won’t just look better; they'll prevent the rod from crashing down.
The Final Touch: Hanging the Curtains
With your brackets firmly in place, you’re in the home stretch. Go ahead and thread your curtain panels onto the rod. If you've chosen a style that uses rings with clips or drapery pins, like classic pinch pleats, attach those now. Try to space them out evenly to get those beautiful, consistent folds.
Once the curtains are on, carefully lift the rod and set it into the brackets. Secure it in place, then step back and take a look. Fluff the panels, adjust the spacing, and admire your handiwork. You just learned the right way to hang curtains—a skill that will make every room in your house feel more finished and inviting.
Styling Your Curtains and Avoiding Common Mistakes
You’ve got your curtains hung high and wide—that's a huge win! But the final styling touches are what really separate a good result from a truly professional one. This is where you get to transform simple fabric panels into elegant drapes that frame your view with purpose and style.
One of the most important finishing steps, and one that gets skipped all the time, is getting rid of the wrinkles. Curtains almost always come creased from the packaging, and hanging them straight out of the bag looks messy and unfinished. The easiest fix? A quick pass with a garment steamer once they're up. This will release the wrinkles and let the fabric drape just the way it's supposed to.
Training Your Curtains for Perfect Folds
If you want that classic, columnar look where your curtains fall in neat, uniform pleats, you’ll need to “train” them. It sounds complicated, but it's a simple technique that makes all the difference.
- Start by arranging the fabric into even, accordion-style folds from top to bottom.
- Next, use loose ribbon or scrap fabric strips to gently tie the folded panels together. Place one tie near the top, one in the middle, and one at the bottom.
- Just let them hang like that for 48-72 hours. This helps the fabric develop a "memory" of the shape, so when you untie them, they’ll hang in those elegant columns instead of looking like a shapeless sheet.
This little bit of effort pays off big time, giving your windows a crisp, tailored appearance that looks effortlessly chic.
A well-styled window treatment does more than just provide privacy; it completes the room's entire story. By steaming and training your curtains, you're making sure the final chapter is just as polished as the first. It's this attention to detail that really defines the correct way to hang curtains.
Sidestepping Common DIY Frustrations
Even when you plan carefully, little issues can pop up during installation. One of the most frequent complaints I hear from homeowners is dealing with an uneven hem. In fact, some consumer surveys show that 65% of people struggle with this, and it almost always comes down to a rod that isn't perfectly level.
Another common headache is the light gap you get along the sides of blackout curtains. The best way to fix this is with a wrap-around curtain rod. It lets the curtain panel curve back and touch the wall, completely blocking that frustrating sliver of light.
For more inspiration on current trends, it's always fun to explore fresh modern window covering ideas. And don't forget, properly styled curtains can even make a room feel bigger and more open. You can get more tips on that in our guide on how to make a small room feel big.
By knowing these common mistakes ahead of time, you can achieve a flawless finish. But if you find yourself wrestling with a tricky window or just need a hand selecting the perfect fabric, our design team here at Miller Waldrop has the tools and expertise to help you bring your vision to life.
Ready to Find Your Perfect Window Treatments?
Now that you know how to hang curtains like a pro, you're ready to make a huge impact on your space. It's one of those projects that truly turns a house into a home, bringing your personal style to life.
But you don't have to go it alone. Think of our design experts as your personal guides, ready to help you find the perfect ready-made panels or dive into custom fabrics for a look that's all your own. We're here to provide the tools you need to create a space you absolutely love.
Why not start by exploring our curated collection of stylish window treatments? It’s the perfect place to get inspired and find the foundation for your design.
We’re here to provide the guidance you need to bring your vision to life. Let us be the trusted guide on your design journey, helping you find the perfect finishing touch.
Come say hello at our showrooms in Lubbock, Hobbs, or Ruidoso Downs. Let's work together to find the window treatments that will truly complete your home's story. Your beautifully styled space is just a visit away.
Answering Your Curtain-Hanging Questions
Even the most seasoned DIY-er runs into questions. Our design team fields these all the time, so we’ve put together the answers to the most common head-scratchers you might face while hanging your curtains.
How High Should I Hang My Curtain Rod?
You want to aim for a spot 4 to 6 inches above the top of your window frame. This is a tried-and-true interior design rule that instantly makes a room feel taller and more open.
Got high ceilings? You can stretch that rule a bit. Consider mounting the rod about halfway between the top of the window and the ceiling. It’s a great trick for drawing the eye upward and really showing off the room's height.
How Wide Should the Rod Be?
Always extend your curtain rod 3 to 6 inches past the window frame on each side. It might seem like a small detail, but it’s critical.
This extra width makes your window feel much grander than it actually is. It also lets you pull the curtain panels completely off the glass, flooding your room with natural light and giving you a clear, unobstructed view.
What's the Right Curtain Length?
For a look that never goes out of style, go for what we call the "floor kiss." This is where the hem just barely skims the floor. It looks clean, intentional, and beautifully tailored in pretty much any setting.
Want something a bit more dramatic? Try a "puddle" length. This style lets the fabric pool 1 to 3 inches on the floor. It creates a soft, romantic feel that works especially well with heavier fabrics like velvet or linen in a formal dining room or bedroom.
Are Wall Anchors Really Necessary?
Yes, one hundred percent. The only time you can skip them is if you're lucky enough to drill directly into a wooden wall stud.
Drywall on its own just isn't built to hold the weight of a rod and curtains, especially heavier drapes. Using the anchors provided is non-negotiable for a secure installation that will stay put for years to come.
Here at Miller Waldrop Furniture & Decor, our design experts are ready to provide you with the tools and guidance needed to find the perfect ready-made curtains or dive into custom fabrics for a look that’s all you. Elevate your home by exploring our hand-picked collection of stylish window treatments today.
