

Can You Put Wallpaper Over Wallpaper? Your Guide to a Flawless Finish

So, you're eyeing a wallpaper refresh and wondering, "Can you put wallpaper over wallpaper?" The short answer is yes, you can, but this shortcut is only for walls in near-perfect condition. Think of it as a powerful time-saver, but one that requires you to know exactly what to look for. This guide will empower you to make the right call for a beautiful, lasting result.
Understanding When to Wallpaper Over Wallpaper
The first, most critical decision you'll make is whether to layer up or strip down. Getting this right is the foundation of your entire project. While skipping the removal process sounds like a dream—saving you a ton of time and mess—a bad call here can lead to peeling, bubbling, and a lumpy finish you'll have to live with every day.
The secret is learning how to inspect your walls like a pro. With over 70+ years of design experience, we've seen it all. We'll equip you with the knowledge to decide if your project is a green light for layering or a hard stop that means it's time to break out the steamer. Your home deserves a flawless look, and you can achieve it by starting with a solid foundation.
A Quick Decision Guide
This flowchart gives you a quick visual on how to make the call. It all boils down to the condition of what's already on your walls.
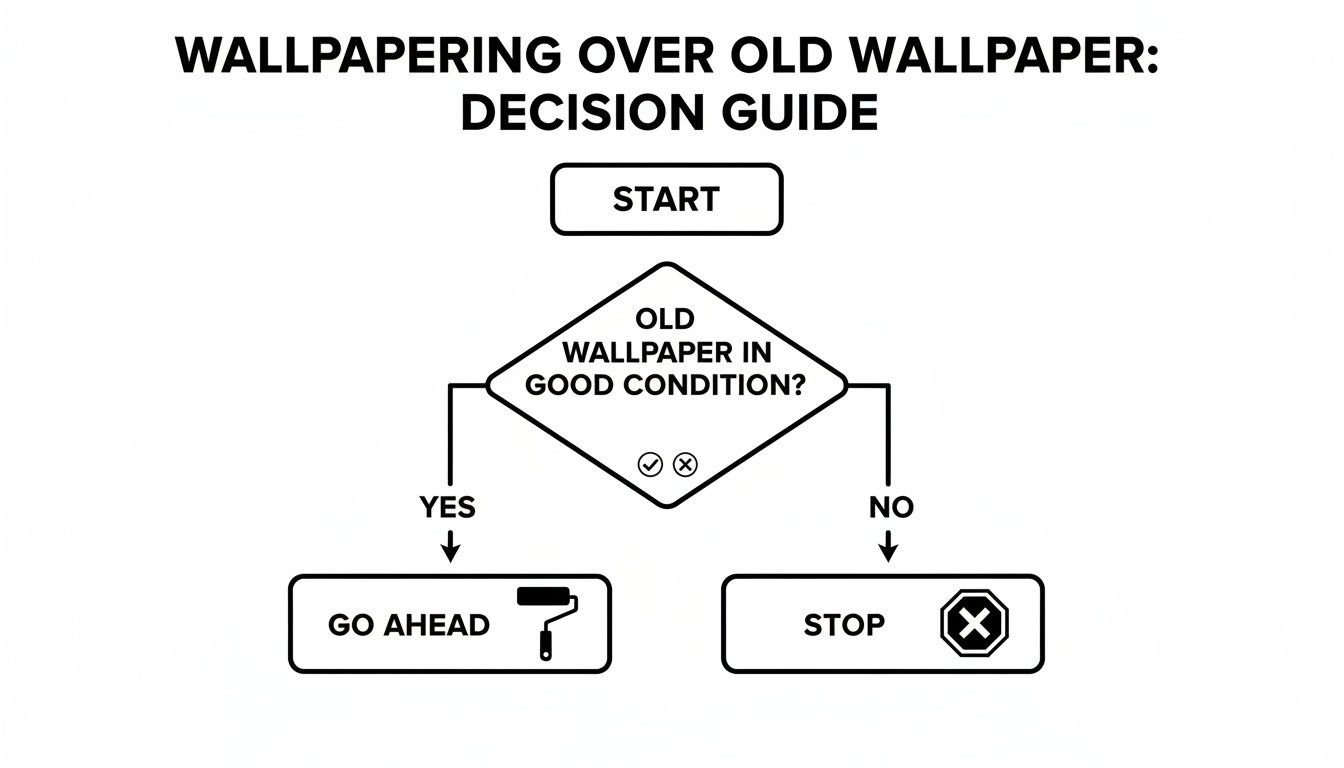
As you can see, if the current paper is in great shape, you're probably good to go. If there are any issues at all, it's time to stop and strip.
Quick Assessment: Should You Wallpaper Over Wallpaper?
Before you even think about buying new wallpaper, run through this quick checklist. It will help you decide if your walls are a good candidate for layering a new design on top.
| Condition to Check | Go Ahead If… | Stop and Remove If… |
|---|---|---|
| Seams & Edges | All seams are perfectly flat and show no signs of lifting. | You see any peeling, curling, or lifted edges. |
| Surface Texture | The existing paper is smooth, flat, and non-textured. | The paper is embossed, flocked, or has a heavy texture. |
| Material Type | It’s a single layer of standard, porous paper. | It’s vinyl, foil, or has a glossy, non-porous finish. |
| Wall Damage | The wall beneath feels solid with no soft spots or bubbles. | You find bubbles, tears, or signs of moisture damage. |
| Adhesion | The paper is firmly stuck to the wall everywhere. | It pulls away easily or feels loose in some areas. |
This quick check can save you a world of trouble. If you find yourself in the "Stop and Remove" column for even one of these points, it's a clear sign that you need to strip the old paper first.
Cost vs. Risk
It's completely understandable why you'd want to layer wallpaper to save a few bucks. Here in Texas and New Mexico, about 65% of DIYers consider it, hoping to avoid the $500-$1,200 cost of professional removal. An overlay project might only run $300-$600.
But here's the catch: professional installers report a 40% higher failure rate when layering over tricky surfaces like vinyl-coated papers. Bubbles and peeling are common culprits. It's worth a moment to discover more insights about wallpapering costs and risks before you commit.
At the end of the day, the goal is a beautiful room that holds up. If you have any doubt after your inspection, starting with a clean slate is always the safest bet.
Key Takeaway: The condition of the first layer dictates the success of the second. A pristine, well-adhered, and non-vinyl wallpaper is the only suitable candidate for being covered. Anything less is a recipe for future headaches.
Ready to transform your room but need a little help pulling the whole vision together? The design experts at Miller Waldrop can help you select the perfect furniture and decor to complement your newly refreshed walls. You can explore our curated selection of top brands to find pieces you'll love.
Your Pre-Project Inspection Checklist
Before you unroll that beautiful new wallpaper, you need to play detective. A thorough inspection is the most critical step in determining if you can safely paper over your existing walls. This isn't just a quick once-over; it's a hands-on examination that will save you from a world of regret later.
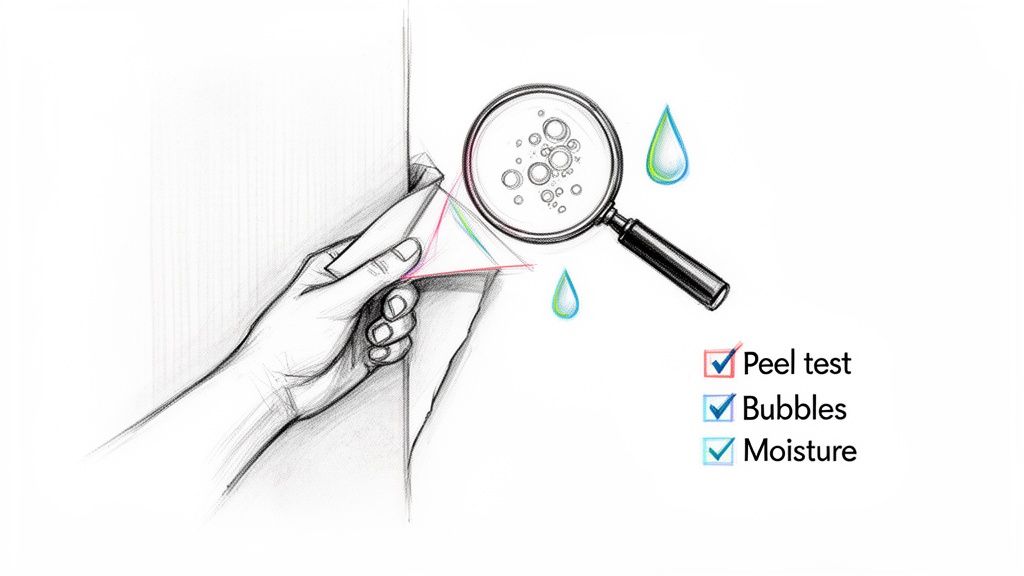
Your mission is to hunt down any imperfection that could ruin your new look. Get right up to the wall and run your hands over every square inch. You're feeling for hidden bubbles, weird bumps, or any soft spots. Pay extra attention to the seams, corners, and the edges near the ceiling and baseboards—these are always the first places wallpaper starts to give up.
Perform a Peel Test in a Hidden Spot
The absolute best way to gauge the old paper’s staying power is with a simple peel test. Find a spot that’s usually hidden, like behind where a sofa might go or inside a closet. Grab a putty knife and try to gently pry up a corner of the wallpaper.
If it comes off easily, or worse, takes the top layer of the drywall paper with it, that’s a hard stop. It’s a dead giveaway that the bond is weak and the wall probably wasn’t primed correctly in the first place. Slapping new, wet wallpaper paste on top will only reactivate the old glue and create a bubbling, peeling disaster. You need a rock-solid bond, no exceptions.
Identify Your Current Wallpaper Type
The type of wallpaper you currently have matters—a lot. Some materials make for a decent base layer, while others are a complete non-starter. You need to figure out if the surface is porous enough for the new adhesive to grab onto.
Here’s a quick field guide to help you identify what you're working with:
- Standard Paper: If it feels like paper and a tiny drop of water soaks in rather than beading up, you're likely in good shape.
- Vinyl or Vinyl-Coated: This is the most common showstopper. If the surface has a sheen or feels slick and plasticky, it's almost certainly vinyl. It's non-porous, meaning new paste has nothing to grip.
- Textured or Embossed: Any paper with a raised pattern—think flock, grasscloth, or anaglypta—has to go. That texture will "telegraph" right through your new layer, and the final result will look lumpy and amateurish.
A crucial word of caution for older homes: your inspection must include an awareness of potential hazards. Before you start peeling or scraping anything, it's vital to understand the risks of asbestos in DIY home improvements.
A flawless backdrop is the secret to a high-end look. Taking the time for a thorough inspection ensures the beautiful, custom furniture you choose—like a stunning Flexsteel sectional—becomes the true star of the room, not the flaws on your walls.
Preparing Your Walls for a Flawless Finish
Once you've decided the existing paper is a good candidate, your success hinges entirely on the prep work. This is where you turn a questionable surface into the perfect canvas. A little patience here is the difference between a DIY disaster and a professional-grade finish that actually lasts.
Your first mission is to hunt down and fix any minor flaws. Even wallpaper that’s stuck on tight can have a few loose corners or seams that have lifted over time. Grab some wallpaper seam adhesive and carefully glue these rebellious edges back down. Use a smoothing tool to press them flat until they’re completely secure. This one little step prevents snags and bubbles later on.
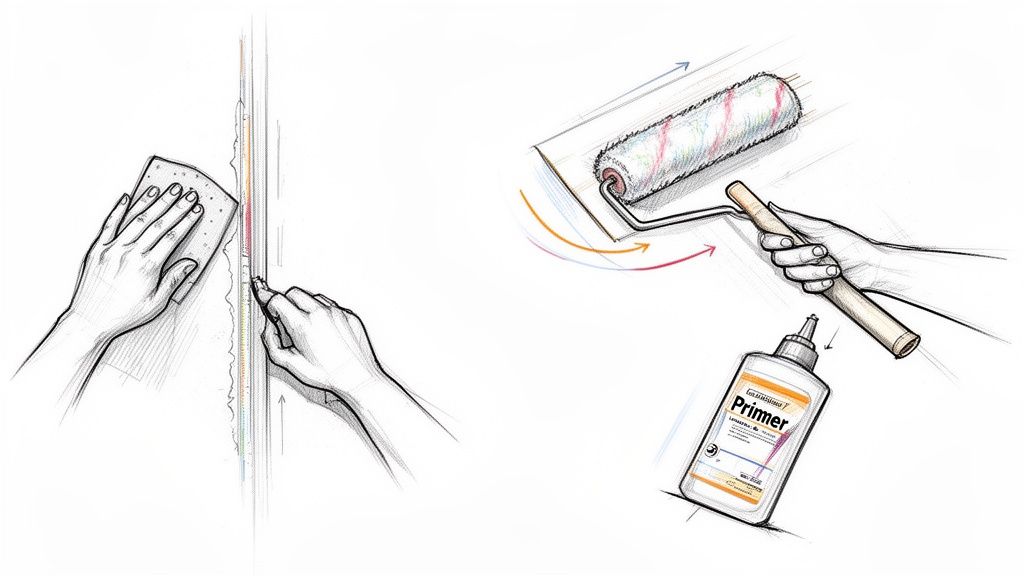
Smoothing the Surface for a Seamless Look
Next up, you need to deal with "telegraphing." That's the industry term for when the seams of the old paper create subtle ridges that show right through your new layer. Run your hand over the seams. If you can feel them, you'll definitely see them later.
The fix is simple. Lightly sand the seams with fine-grit sandpaper—220-grit is a great choice—just enough to knock down any high spots. You're not trying to sand the paper off, just feather the edges to create a smooth transition. After sanding, wipe the entire wall down with a damp cloth to get rid of every bit of dust and grime. You absolutely need a clean surface for the new adhesive to work properly.
The Power of the Right Primer
This is the most critical part of your prep, so do not skip this step. You need a specialized shellac-based or oil-based primer designed specifically for sealing wallpaper—not just a regular paint primer.
Here’s why it’s a non-negotiable part of the process:
- It creates a moisture barrier. This is the big one. The primer seals the old paper, stopping the moisture from your new wallpaper paste from soaking through and reactivating the old glue. This is the #1 reason people get bubbles when they try to paper over paper.
- It blocks bleed-through. If the old wallpaper has a dark or vibrant pattern, a quality primer will stop those colors and designs from ghosting through your beautiful new paper.
- It provides "grip." The primer creates a perfect, uniform surface for the new adhesive to grab onto, ensuring a strong, permanent bond.
I’ve seen it happen too many times: someone uses a water-based primer, and it causes the old paper to swell up and bubble—the very thing they were trying to avoid. Spend the extra few dollars on the right product. It's the real hero of this project.
By following these steps, you’re not just covering up an old wall; you’re building a stable, reliable foundation. You're creating the ideal conditions for your new wallpaper to shine. Now that the walls are handled, ready to find the perfect furniture to complete the look? Explore our design services to get expert advice on pulling your entire room together.
Choosing the Right Wallpaper and Tools for the Job
Your success with this project hinges just as much on the new wallpaper as it does on the condition of the old wall. You're looking for a heavyweight champion—a paper that’s thick, high-quality, and completely opaque—to masterfully hide any minor flaws or patterns bleeding through from underneath.
Imagine trying to cover a dark shirt with a thin white one; you'll see the shadow right through it. It's the same principle here. A flimsy wallpaper will only highlight the very imperfections you're trying to cover. High-quality, non-woven or solid vinyl wallpapers are fantastic for this because their weight and texture provide superior coverage. While peel-and-stick options are tempting, they're typically much thinner and can accentuate the texture of what's beneath them.
Selecting Your New Wallpaper
When you decide to wallpaper over wallpaper, your new selection has to pull double duty. It needs to be heavy enough to stop the old design from "ghosting" through and tough enough to handle the adhesive without bubbling or warping. This is one of those projects where investing in quality materials pays huge dividends.
Here's what to check for when choosing a paper for a layering job:
- Opacity is Everything: Hold a sample of the wallpaper up to a light. If you can see light or pattern through it, it's a no-go for this project.
- Texture is Your Friend: A new wallpaper with a subtle texture or a busy pattern is a secret weapon. It’s brilliant at camouflaging any slight bumps or the faint lines from the old seams.
- The Right Material Makes a Difference: Non-woven wallpapers are a dream to work with. They're breathable, resist tearing, and are often "paste-the-wall," which makes the application process feel much less chaotic.
If you’re still exploring options, you might find some great ideas in our guide on how to add color without painting.
Assembling Your Project Toolkit
Having the right tools is non-negotiable. A well-stocked toolkit is what separates a frustrating afternoon from a smooth, professional-looking finish. These aren’t just items on a shopping list; they are the instruments that will bring your vision to life.
A HomeAdvisor poll of 5,000 U.S. pros found that 62% are on board with single-layer overlays, but only when the old seams are properly sanded down first. They also noted that thicker wallpapers (over 0.2mm) are critical for success, as they can hide 90% of old textures and help the new layer last longer. You can discover more insights about wallpaper longevity from this research.
Here’s what your essential toolkit should look like:
- A sharp utility knife with plenty of extra blades. A dull blade will tear your paper, so swap it out often.
- A wallpaper smoothing tool to gently work out every last air bubble.
- A seam roller is a must for pressing the edges down firmly so they don't peel up later.
- The correct wallpaper adhesive specifically recommended for your type of paper.
- A measuring tape and a level to ensure every panel goes up perfectly straight.
With the right paper and tools in hand, you're not just redecorating—you're preparing for a lasting and beautiful transformation. A stunning new accent wall can be the perfect backdrop for a statement piece like a unique console table, pulling the whole room's design together.
Hanging Your New Wallpaper Like a Pro
Alright, this is the moment of truth. Your walls are prepped, your tools are laid out, and it's time to bring your vision to life. The key to a professional-looking finish is all about patience and precision, so take a deep breath and let's get started.
The very first strip you hang is the most critical piece of the puzzle. It dictates how every other strip will line up, so getting it perfectly straight is non-negotiable. A common mistake is using a corner or the ceiling as a guide—they're almost never truly straight.
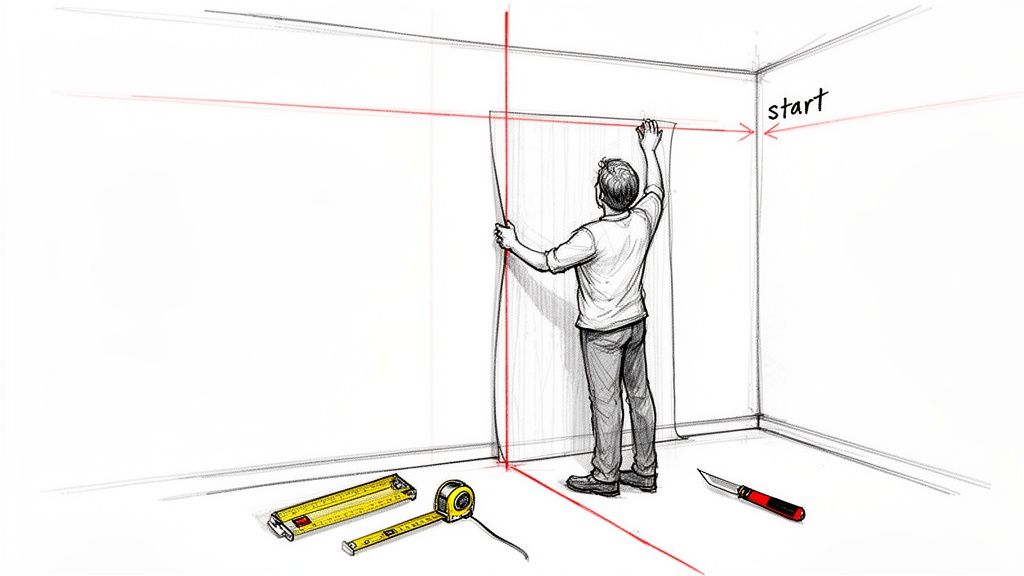
Instead, pick a less obvious starting point, maybe a corner that a tall bookshelf will eventually hide. From there, use a level or a laser level to draw a dead-straight vertical line, called a plumb line. This line is your guide—it guarantees your pattern starts straight and stays that way.
Mastering the First Strip
Before you make your first cut, measure the wall's height and then add an extra four to six inches. This little bit of overhang, called a "trim allowance," is a lifesaver. It gives you some wiggle room to get a perfectly clean cut at the ceiling and baseboard once the paper is up.
Now, carefully line up the edge of that first strip with the plumb line you drew, not the wall corner. Start from the top and work your way down, using a wallpaper smoother to gently press the paper to the wall. Your goal is to work any air bubbles from the center out toward the edges.
Pro Tip: It's tempting to really lean into the smoothing tool, but a firm, gentle pressure is all you need. Pushing too hard can stretch the paper or squeeze out too much adhesive, which creates its own set of problems.
Navigating Tricky Areas
You’re going to run into obstacles like light switches, outlets, and corners. Don't sweat it. They look more intimidating than they actually are.
- Outlets and Switches: First things first, kill the power at the circuit breaker. Hang the wallpaper right over the opening. Then, take your utility knife and carefully cut a small 'X' over the outlet box. Trim away the flaps, but leave about a quarter-inch border that you can tuck behind the cover plate for a seamless look.
- Corners: When you get to an inside corner, let the paper wrap around it by about half an inch. For the next piece, just overlap that small section, making sure your pattern lines up perfectly before smoothing it down.
When you do it right, a single-overlay wallpaper job can easily last 12-15 years, which is just as long as a job on fresh walls. Success really comes down to the prep work. Research shows that properly sanding the old seams can make them 80% less visible, and using the right primer can slash the risk of bubbles by 60%. You can read the full research about these wallpaper findings if you're curious about the data behind it.
You'll find your confidence grows with each strip you hang. You're not just redecorating; you're truly crafting a space with your own two hands. And if this project gets you thinking about bigger design ideas, check out our guide for more expert tips on creating a stunning accent wall.
When Stripping Old Wallpaper Is Non-Negotiable
Knowing when you can hang new wallpaper over old is one thing, but knowing when you absolutely shouldn't is what saves you from a world of headaches. Some walls flash giant warning signs that layering just isn't an option. Ignoring these deal-breakers is the fastest way to end up with peeling, bubbling, and a completely wasted weekend.
The first hard stop? The type of wallpaper that's already there. If your walls are currently covered in vinyl, foil, or any kind of glossy, non-porous paper, you have to take it down. New wallpaper adhesive needs something to grip onto, and it just can't bond with these slick surfaces. Your new paper will be doomed from the start, almost guaranteed to slide or peel off within a few months.
Red Flags You Can't Ignore
Beyond the material itself, you have to assess the wall's overall condition. A single, perfectly adhered layer might be okay to cover. But if you discover more than one layer of old wallpaper, it’s time to strip everything down to the drywall. Each layer adds weight and instability, making a truly smooth, professional finish next to impossible.
Even more crucial are the signs of what's happening underneath the surface. Keep a sharp eye out for:
- Moisture or Mold: Any hint of discoloration, water staining, or that distinct musty smell is a serious red flag. Covering up these problems only traps the moisture, which is a perfect recipe for mold growth. This won't just ruin your wallpaper; it can cause real damage to your drywall and impact your home's air quality.
- Serious Damage: You can't just paper over large tears, areas where the old paper is peeling away, or crumbling plaster. These aren't cosmetic issues; they point to a compromised foundation that needs to be properly repaired before you even think about putting up a new wallcovering.
Making the right call here is about so much more than just how the room will look. It’s about protecting the long-term health and value of your home. A beautiful finish always starts with a sound, clean, and stable surface.
If you peel back a corner and find something more serious, like crumbling plaster or signs of water damage, it's best to pause. Creating the perfect canvas for a new look is what we do best. The Miller Waldrop design team is always here to offer personalized advice, helping you solve any design challenge and get your room ready for its stunning transformation.
A Few Lingering Questions
Even with a solid game plan, a few questions always seem to surface right before you dive into a wallpapering project. Getting these answers sorted out now will save you from headaches later and really drive home why certain steps are non-negotiable.
What About Wallpapering Over a Textured or Embossed Finish?
Honestly, I’d strongly advise against it. Any texture underneath is almost guaranteed to show through your new paper. It's a frustrating issue designers call "telegraphing," and it leaves you with a lumpy, unprofessional look that completely ruins the effect.
If you're after that perfectly smooth, high-end finish, the old textured paper has to come down first. There’s really no shortcut here.
Which Primer Should I Use to Seal the Old Wallpaper?
You'll want to grab an oil-based or shellac-based primer. Think of it as creating a waterproof seal over the old paper. This barrier stops the moisture from your new wallpaper paste from seeping through and reactivating the old adhesive underneath.
Whatever you do, steer clear of water-based primers. They’ll do the exact opposite of what you want, causing the old paper to bubble and lift—the very disaster you're trying to avoid.
The right primer isn't just a helpful tip; it's the single most important element for turning that old wallpaper into a stable, reliable base for your new look.
Is Another Layer of Wallpaper Going to Make My Walls Too Thick?
A single extra layer, especially if the papers are a standard thickness, usually isn't a big deal. The problems start when you get into multiple layers.
You’ll begin to see a noticeable ridge where the wallpaper edge meets your door frames, window trim, and baseboards. It can also mess with the fit of your outlet covers and light switch plates, making them sit awkwardly on the wall. This is exactly why the pros will tell you to never, ever layer wallpaper more than once.
If you're trying to figure out the right design, our guide on working with patterns has some great advice for picking something that will truly elevate your room.
You’re well on your way to a fantastic home transformation. Now that you have the know-how, the team at Miller Waldrop Furniture & Decor can help you complete the vision. We have the furniture and decor to make those beautiful new walls shine. Visit our showroom or browse online to find the perfect pieces to finish off your newly refreshed space.