Clean Guide: cleaning couch with steam cleaner to banish stains
Before you even think about plugging in that steam cleaner, a few quick checks are your best friend. This isn't just busywork; it's the crucial step that separates a beautifully refreshed sofa from a costly, heartbreaking mistake. Mastering this prep work empowers you to achieve a fantastic, professional-level clean.
Your Pre-Cleaning Game Plan
Getting your couch back to its former glory starts long before you fill the steamer's water tank. A successful deep clean is all about having a solid game plan. This isn't just about avoiding disaster; it's about knowing how to protect your furniture investment and get that like-new look you're after. Your steam cleaner is the tool, and this guide is your strategy for victory.
It's no wonder steam cleaning is getting so popular. It offers a powerful, chemical-free way to sanitize and refresh upholstery. This trend is huge in the home cleaning world—the global steam cleaners market was valued at USD 3.86 billion in 2024 and is expected to jump to a staggering USD 7.48 billion by 2033. People want healthier, cleaner homes, and steam delivers.
First Things First: Find That Fabric Code
Before a single drop of water touches your upholstery, you need to play detective. Find the manufacturer’s care tag, usually sewn into a seam under a cushion or on the couch's frame. This little label is your instruction manual, and it holds the key to a safe cleaning process. On it, you'll find a letter code that tells you exactly what you can (and can't) do.
Most people don't realize these codes exist, but they're the single most important factor in whether you can steam clean your couch. Here's a quick guide to help you make sense of it all.
Understanding Your Couch Fabric Cleaning Codes
| Code | Meaning | Safe for Steam Cleaning? |
|---|---|---|
| W | Water-Based Cleaner | Yes, generally safe. |
| S | Solvent-Based Cleaner Only | No, absolutely not. |
| W/S | Water or Solvent-Based Cleaners are okay | Maybe—spot test is vital. |
| X | Vacuum Only | No, avoid all liquids. |
Ignoring these codes is a gamble you don't want to take. Using water or steam on an 'S' or 'X' coded fabric can cause permanent water stains, nasty color bleeding, or even fabric shrinkage. A few seconds spent checking that tag can save you from a major disaster. For a deeper dive into different fabric types, you can explore this guide on everything you need to know about upholstery materials.
The Non-Negotiable Vacuum Pass
Once you've confirmed your couch is steam-safe, it's time to vacuum. And I mean really vacuum. Don't just give it a quick pass. Grab your vacuum's crevice tool and upholstery brush and get into every single seam, nook, and cranny. Lift up the cushions and vacuum the frame underneath.
Why is this so important? Because if you skip it, you’re basically just making mud. When hot steam hits loose dirt, dust, and pet hair, it creates a grimy slurry that gets pushed deeper into the fabric. You'll end up with dark, streaky lines that are a nightmare to remove. A thorough vacuuming is your first real step to a clean couch.
The All-Important Spot Test
This is your final pre-flight check. Even with a 'W' tag, you never know exactly how a specific fabric will react to heat and moisture. That’s why a spot test is your ultimate insurance policy.
Pick a small, hidden area to test—the back of the couch near the floor, the underside of a cushion, or a piece of fabric on the frame are all good spots.
- Apply a bit of steam to this small patch.
- Let it dry completely. This might take an hour or two.
- Once it's dry, inspect it closely in good light.
Look for any changes in color, texture, or any signs of water spotting. If it looks exactly the same as the surrounding fabric, you've got the green light. You can now proceed with confidence, knowing you won't be in for any nasty surprises. Before diving in, it's always helpful to understand the basics of how to clean a fabric couch to build a solid foundation.
Mastering Your Steam Cleaning Technique
Alright, you've done the prep work, and now it's time for the main event. This is where the magic happens—where you take that lived-in couch and give it a deep, restorative clean. We're not just aiming for a quick once-over here. The goal is a professional-level finish, free of streaks and watermarks, and that all comes down to technique.
Think of your steam cleaner as more than just a machine; it's the perfect tool for you to conquer the dirt, allergens, and mystery smells that have settled into your sofa. Getting the hang of it is what separates a so-so job from a truly satisfying one.
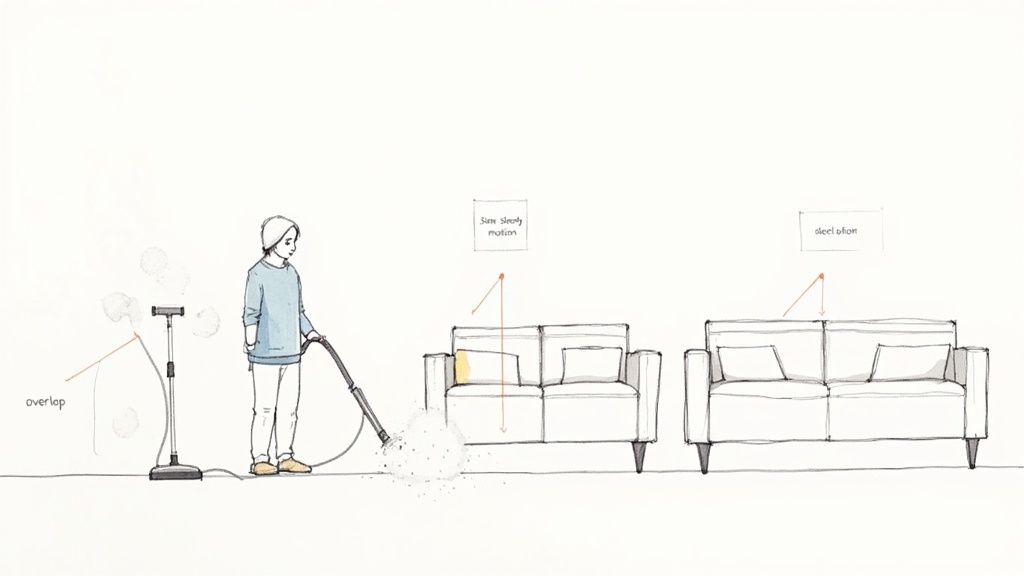
Before you pull that trigger, just double-check that you've covered the basics. This quick visual is a good reminder of the groundwork you should have already laid.
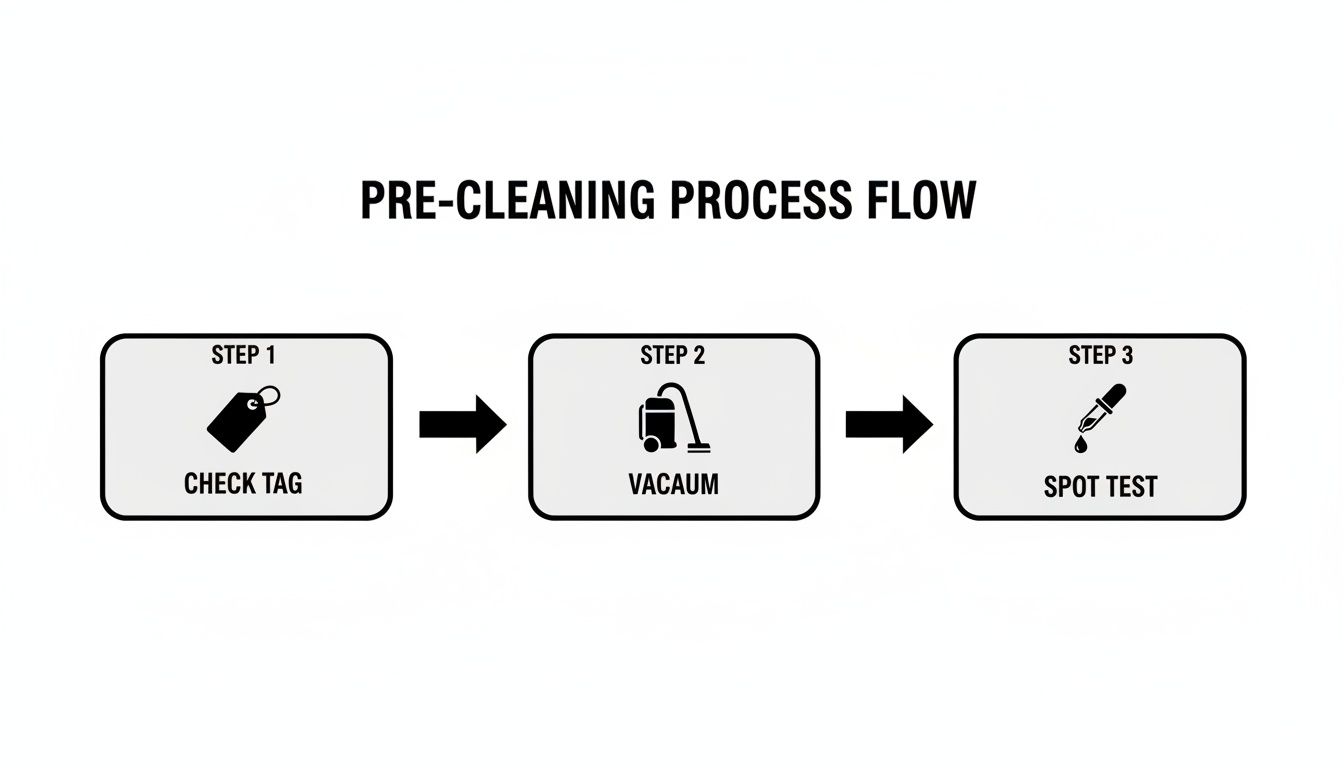
Running through these three steps—checking the cleaning code, giving it a good vacuum, and doing a spot test—is what sets you up for a successful, damage-free cleaning session.
Setting Up Your Machine for Success
First things first, let's get your machine ready for upholstery. Most steam cleaners come with a whole arsenal of attachments, but you'll want to grab the dedicated upholstery tool. It's usually a smaller, triangular or rectangular head designed specifically for fabric. A common mistake is using the big floor attachment—don't do it. It will absolutely oversaturate the fabric and could easily damage the fibers.
Next up is the water. Fill the tank with distilled water. It might be tempting to just use tap water, but most tap water is full of minerals. Over time, those minerals can clog your machine and, worse, leave chalky deposits on your couch. Distilled water gives you pure, clean steam that's safe for both your gear and your furniture.
Finally, you need to dial in the steam pressure. Every fabric is different, so a one-size-fits-all approach is a recipe for disaster.
- For delicate fabrics like microfiber or some synthetics, start on a low to medium setting.
- For durable fabrics like canvas or a heavy weave, you can usually go with a higher pressure setting for a deeper clean.
When in doubt, always start low. You can always bump the pressure up if you need to, but you can’t undo damage from going in too hot.
Remember, the goal is to let the steam do the work. The combination of high heat and controlled moisture is what breaks down dirt and sanitizes the fibers. It's all about finding that sweet spot between being effective and being gentle on your couch.
The Art of the Slow and Steady Pass
When you actually start cleaning, your technique is everything. Rushing through this will only leave you with a blotchy, uneven mess. The trick is to work methodically in small, manageable sections—think one to two square feet at a time.
You should always start at the highest point of the couch, like the top of the backrest, and work your way down. This top-to-bottom strategy keeps dirty water from dripping onto areas you’ve just cleaned. As you guide the upholstery tool across the fabric, use slow, deliberate strokes. Imagine you're painting a wall and aiming for perfect, even coverage. It's the same idea here.
Make sure each pass overlaps the previous one by about an inch. This is the secret to preventing those annoying streaks and watermarks. A consistent, unhurried pace gives the steam enough time to penetrate deep into the fibers, loosen the grime, and let the machine’s suction pull out all the dirty water. This systematic approach is the best way to clean upholstery and sidestep the common frustrations that trip people up.
Achieving a Deep, Sanitizing Clean
One of the biggest perks of steam cleaning is its sanitizing power. That hot vapor, often reaching over 200°F, is incredibly effective at killing 99.9% of germs and bacteria—all without a single chemical. This is a huge win for a healthier home. It's no wonder the steam cleaner market is projected to grow by USD 491.3 million between 2025 and 2029. People are catching on to how powerful chemical-free cleaning can be.
To really get that deep, sanitizing clean, you'll want to pay extra attention to the high-traffic zones on your couch.
- Armrests: These are magnets for skin oils, dirt, and germs. Give them a couple of slow, overlapping passes.
- Headrests: Just like the armrests, these spots collect oils and bacteria.
- Seat Cushions: This is ground zero for crumbs, spills, and allergens. Be thorough and work section by section.
If your cushions are removable, definitely clean both sides. This gives you a truly comprehensive clean and lets you flip them later on to even out the wear. Just be sure to let one side dry completely before you start on the other to avoid trapping moisture inside, which could lead to mildew. Master these techniques, and you're not just getting rid of surface dirt—you're creating a cleaner, healthier space for everyone.
Tackling Tough Stains and Odors
There are times when a standard steam clean just won't cut it. You're faced with a stubborn, set-in stain or a scent that just won’t quit. This is where you graduate from routine maintenance to full-on furniture rescue. With the right game plan, you can confidently go after spills from coffee, wine, or greasy snacks and get your couch back to being genuinely fresh and inviting.
The real beauty of steam cleaning is that it’s more than a surface-level fix. The high-temperature steam dives deep into the fabric fibers, attacking stains and odors right at the source. It's a method that truly eliminates problems instead of just masking them.
Pre-Treating Your Way to Victory
I can't stress this enough: the secret to beating a tough stain is getting a head start before you even turn on the steam cleaner. Applying a pre-treatment gives you a huge advantage by breaking down the stain's bond with the fabric, making it easy for the steam to lift it away. Think of it as sending in a specialized crew before the main cleanup begins.
For common water-based spills like coffee, juice, or that dreaded glass of red wine, a simple homemade solution often does the trick.
- Mix it up: Combine equal parts white vinegar and water in a clean spray bottle.
- Apply lightly: Gently mist the stained area. You're aiming for damp, not soaked. Just enough for the solution to get to work.
- Let it sit: Give the mixture about 10-15 minutes to dwell on the stain. This gives the vinegar time to break down the pigments.
Greasy or oily stains from things like pizza or buttery popcorn need a different tactic. Sprinkle a generous amount of cornstarch or baking soda directly onto the spot. Let it sit for at least 20 minutes to pull the oil out of the fibers, then vacuum it up completely before you bring in the steam.
Key Insight: When you're facing a serious stain, pre-treating isn't an optional step—it's the most critical part of the entire process. By loosening the stain's grip first, you set your steam cleaner up for success and avoid accidentally setting the stain permanently with the heat.
Zeroing In on Spots with Precision Tools
After pre-treating, it's time to bring in the focused power of your machine. Most steam cleaners come with smaller attachments, like a detail nozzle or a jet nozzle. For targeted stain removal, these are your best friends. They concentrate the steam into a powerful, precise stream.
Swap out the wide upholstery tool for one of these smaller attachments. Hold the nozzle an inch or two away from the stain and hit it with short bursts of steam. Always work from the outside edge of the stain toward the center—this keeps it from spreading. After a few bursts, gently blot the area with a clean microfiber cloth to lift away the loosened grime. Just repeat this steam-and-blot process until the stain vanishes.
Conquering Pet Stains and Odors
We love our pets, but their messes are a unique kind of challenge. Pet stains, especially urine, contain proteins and uric acid that need a specific game plan. While steam is fantastic for killing odor-causing bacteria, the heat can sometimes "set" the protein in a urine stain, making it nearly impossible to remove.
Because of this, you should always use an enzymatic cleaner before you steam. These products contain special enzymes designed to break down the specific proteins in pet waste. You can equip yourself with a powerful weapon like this professional-strength enzymatic cleaner to make sure you're ready for anything. Treat the spot with the enzymatic cleaner, blot it up thoroughly, and then go over the area with your steam cleaner to sanitize and knock out any lingering smells.
Sometimes, you might also need to look into specialized pet grooming and cleaning supplies for those extra-tough situations.
Banishing Odors for Good
Lingering smells from smoke, last night's dinner, or pets can make a couch feel dirty even when it looks pristine. Steam is an incredible deodorizer because it doesn’t just cover up odors with fragrance—it actually destroys the bacteria and organic matter causing them.
The demand for this kind of deep clean is on the rise. In the rapidly growing Asia-Pacific market, one of the biggest drivers for steam cleaner sales is their proven ability to deep clean upholstery, remove allergens, and kill 99% of bacteria. This shift is fueled by a greater awareness of home hygiene, making tasks like steam cleaning a couch a top priority.
To fully deodorize your couch, go back to the main upholstery tool and use that slow, overlapping pass technique we talked about. The consistent, penetrating heat will neutralize odors trapped deep within the cushions and frame, leaving your furniture smelling genuinely clean, not just perfumed.
What to Do After You've Finished Steam Cleaning
You’ve powered down the machine and your couch already looks a million times better. It’s so tempting to kick back and admire your work, but what you do in the next few hours is just as important as the cleaning itself. Getting the drying process right is the final, critical step to avoiding musty smells or water spots and locking in that fresh, clean feeling.
Think of it as the cool-down lap after a race. Rushing this part can unfortunately ruin all the effort you just put in.
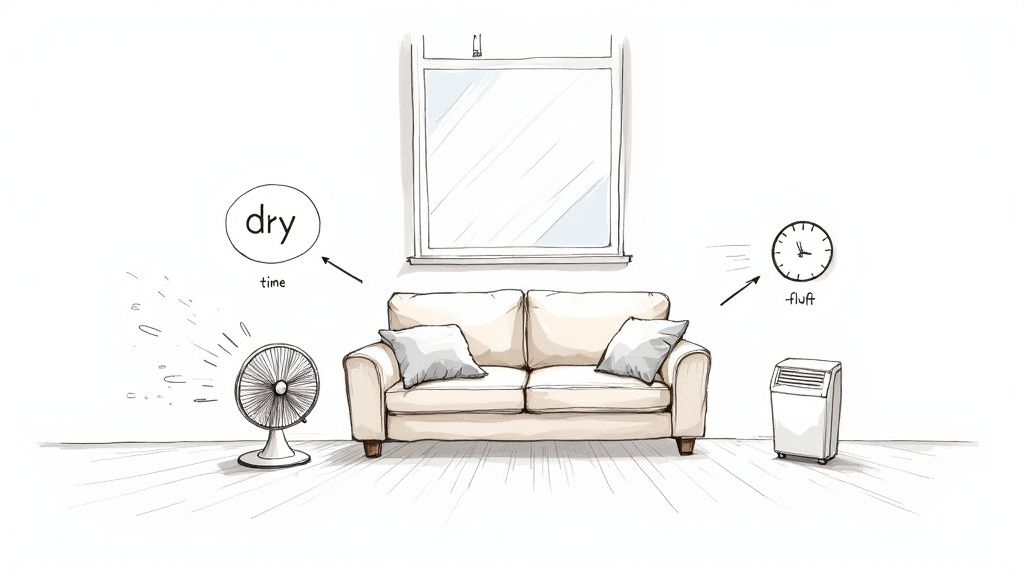
It's All About Airflow
Moisture is your biggest enemy right now. If it hangs around in the fabric for too long, you're rolling out the welcome mat for mold and mildew, which leads to that dreaded damp smell and can even cause health issues. Your mission is simple: get air moving around every inch of that couch.
Don't just shut the door and hope for the best. You need to create an environment that actively pulls moisture from the upholstery.
- Open up the windows. If the weather's cooperating and it isn't too humid, get a cross-breeze going. It’s the easiest and most effective first move you can make.
- Turn on the fans. Grab a box fan or an oscillating fan and point it across the surface of the couch, not directly at one spot. You're aiming for broad, gentle airflow over the frame and all the cushions.
- Fire up a dehumidifier. This is the pro move, especially if you live somewhere humid. A dehumidifier will actively suck moisture out of the air, seriously cutting down on drying time and minimizing any risk of mildew.
A couch that stays damp for a day or more is a playground for bacteria, and that completely defeats the purpose of the deep clean you just did.
Be Patient—It’s Worth the Wait
So, the big question: when can you finally flop down on your clean couch? It really depends on the fabric, how humid your house is, and how much water was left behind. As a rule of thumb, plan on the couch being off-limits for at least 6 to 12 hours.
For couches with thicker, denser fabrics, you might be looking at a full 24 hours. The best test is the simplest one. Take a clean, dry paper towel and press it firmly into a few different areas, paying special attention to the seams and corners where water likes to hide. If you see any trace of dampness on the towel, it needs more time.
Whatever you do, resist the temptation to sit on it or throw the decorative pillows back on too early. Using a damp couch can flatten the fibers, leaving you with a weird, matted texture. Let it dry completely—that’s the secret to getting a crisp, professional-looking finish.
The Finishing Touch to Restore Softness
Once your couch is completely, 100% bone-dry, there’s one last little step that makes a huge difference. Sometimes, the steam cleaning process can leave the fabric feeling a little stiff or flat once it dries.
Grab a clean, soft-bristled upholstery brush. Gently brush the entire surface, using light, overlapping strokes all going in the same direction. This simple move lifts the fabric's nap, separates the fibers, and brings back that soft, plush feel you love. It’s what makes your couch not just look clean, but feel brand new.
Nailing these final steps ensures your couch is perfectly refreshed, thoroughly dried, and ready for many more years of movie nights and lazy afternoons. If you're inspired to find the perfect foundation for your beautifully clean living room, explore our curated collection of high-quality, durable sofas designed for real family life. Let us help you choose the piece that will be the heart of your home.
Working Through Common Steam Cleaning Glitches
Even when you follow all the rules, things can sometimes go sideways. Don't sweat it—most of the common issues that crop up when steam cleaning a couch are surprisingly easy to fix. With these solutions in your toolkit, you can handle any little hiccup and get that flawless finish you're after.
Think of these moments not as failures, but as the final exam for your new skills. Knowing how to react is what separates the novices from the pros.
Dealing With Those Annoying Water Streaks
You've done the work, the couch is finally dry, but now you're seeing faint, streaky lines across the fabric. This is probably the most common complaint. It usually boils down to one of a few things: you used a bit too much water, moved the cleaning wand too fast, or there was some old detergent residue hiding in the fabric.
First things first, don't panic. The fix is usually pretty simple.
- Run the steam cleaner over the streaky spots again, but this time, use only distilled water—no cleaning solution.
- Slow way down on this second pass. You want to give the machine's suction plenty of time to pull up every last drop of moisture.
- Make sure you're overlapping your strokes by at least 50%. This is key for blending everything together seamlessly.
This careful second pass almost always lifts that leftover residue and evens out the moisture, making those streaks a distant memory.
What to Do When the Fabric Feels Stiff or Crunchy
Ever finish cleaning and find the fabric feels a little… crunchy? It's not damaged. This is almost always caused by mineral deposits left behind from tap water or from the fabric's fibers getting a bit matted down during the process.
Thankfully, getting that soft, plush feel back is dead simple. All you need is a clean, soft-bristled upholstery brush. Once the couch is 100% dry, gently brush the entire surface, making sure to go in one direction. This simple action lifts and separates the fibers, breaking up any stiffness and bringing back that wonderful, soft texture.
A final brushing isn't just for looks; it’s a crucial step for restoring the fabric's natural feel. This little bit of effort revives the upholstery's nap and makes sure your couch is as comfortable as it is clean.
When a Tough Stain Just Won't Quit
You’ll occasionally run into a stubborn stain that just doesn't want to lift on the first pass. This happens a lot with older, set-in stains or anything oil-based. The steam likely loosened it, but it's going to need a little extra convincing to leave for good.
There's no need to steam the whole couch again. Just zero in on that one problem spot.
- Hit the spot again with your pre-treatment solution. Let it dwell for another 15-20 minutes to really get back to work breaking down the stain.
- Switch to a detail nozzle on your steam cleaner if you have one. This lets you focus a powerful jet of steam right where you need it. Always work from the outside of the stain inward to avoid spreading it.
- As soon as you steam it, blot the area immediately with a clean, white microfiber cloth to pull up the gunk you just loosened. You might need to repeat the steam-and-blot cycle a few times, but it'll get there.
With these tricks up your sleeve, you're ready to handle just about anything your couch—or your steam cleaner—throws at you. And if you're thinking it might be time for a sofa that's truly built for real life, messes and all, explore our collection of durable and stylish sofas. We can help you find that perfect centerpiece for your home that can stand up to whatever comes its way.
Your Top Couch Cleaning Questions Answered
Even with a solid plan, a few last-minute questions always seem to pop up. Before you dive in, let’s tackle those common concerns head-on. Arming yourself with these answers will give you the final boost of confidence you need to do the job right.
How Often Should I Steam Clean My Couch?
This really comes down to your lifestyle. For an average household, a good, deep steam clean once or twice a year is usually plenty to keep your couch looking fresh and feeling hygienic. It's a great way to manage everyday dust and allergens.
But let's be realistic—not all homes are "average."
- Homes with Pets or Kids: You know how it is. Between muddy paws and spilled juice, life happens. In this case, stepping up your cleaning schedule to every 3-6 months will help you stay on top of messes before they settle in for good.
- Allergy Sufferers: If you're sensitive to dust mites, dander, or other indoor allergens, a quarterly cleaning can make a huge difference in your home's air quality and help keep those sniffles at bay.
And remember, promptly spot-treating spills as they happen is the best way to keep your sofa looking great between those deeper cleaning sessions.
Can I Use a Steam Cleaner on Any Couch Fabric?
This is a big one, and the short answer is a hard no. You can't just point a steamer at any old fabric and hope for the best. Heat and moisture can be a disaster for the wrong material. Before you do anything else, find the cleaning tag on your couch.
Here's the deal: Fabrics tagged with a 'W' (for water-based cleaning) or 'W/S' (water or solvent) are generally good candidates. But you absolutely must avoid steaming fabrics marked 'S' (solvent only) or 'X' (vacuum only). You risk causing permanent water spots, shrinkage, or color bleeding. Delicate materials like silk or certain velvets are also usually a no-go zone for steam.
When in doubt, always test on a hidden spot first.
Will Steam Cleaning Remove Every Single Stain?
Steam is a fantastic weapon against most of the common stains we see on sofas—think food spills, dirt, and general grime. The high heat does a brilliant job of breaking down the bonds that hold the stain to the fabric fibers, making it much easier to lift away.
But it’s not a miracle worker. Stubborn, old stains from things like ink, red wine, or permanent marker have likely set deep into the fibers. Steam alone might not be enough to get them out completely. For those tough spots, pre-treating isn't just a suggestion; it's a necessity if you want to see real results.
Is a Carpet Steam Cleaner Okay for My Sofa?
I see this question a lot, and it's a risky move. While some machines are branded as "all-in-one," using a big, clunky carpet cleaner on your sofa is asking for trouble. Those floor tools are built for tough, flat carpets and are often way too powerful and wet for upholstery.
You’ll get much better—and safer—results by using a proper handheld upholstery attachment. This little tool is your best friend. It gives you the control you need, is far gentler on the fabric, and, most importantly, helps prevent the oversaturation that leads to mildew and water damage.
Ready to find the perfect foundation for your beautifully clean living space? At Miller Waldrop Furniture & Decor, we believe your furniture should be as resilient as your family. Explore our curated collection of high-quality, durable sofas designed for real life. Let us help you choose the piece that will be the heart of your home for years to come.