The Best Way to Clean Upholstery Like a Pro
Before you can conquer a spill or begin a deep clean, your first mission is to find your furniture’s cleaning code. This isn’t just a friendly suggestion—it’s the single most important piece of information you need to keep your upholstery looking its best and ensure your victory.
You'll usually find it on a small tag tucked under a cushion or along an inside seam. This little letter is your roadmap, telling you exactly which tools you can and can't use on the fabric. Getting this wrong is the number one reason for DIY disasters. Using water on a solvent-only fabric, for example, can leave behind permanent rings, discoloration, or even change the texture for good. You have the power to prevent that.
Your Upholstery Cleaning Success Starts Here
A little prep work before you start cleaning makes all the difference. Think of it as gathering your intel. Rushing in with a random cleaner is a gamble, and your favorite armchair isn't something you want to take chances on.
Taking a few minutes to understand what your furniture needs is the foundation of a successful refresh. You can ensure your pieces remain a source of comfort and pride, not a source of regret.
Demystifying Fabric Cleaning Codes
That little tag with the letter code is the manufacturer's direct instruction manual for your fabric. It’s a simple system, but ignoring it can be a costly mistake.
To make it easy, here's a quick reference guide to what those letters actually mean.
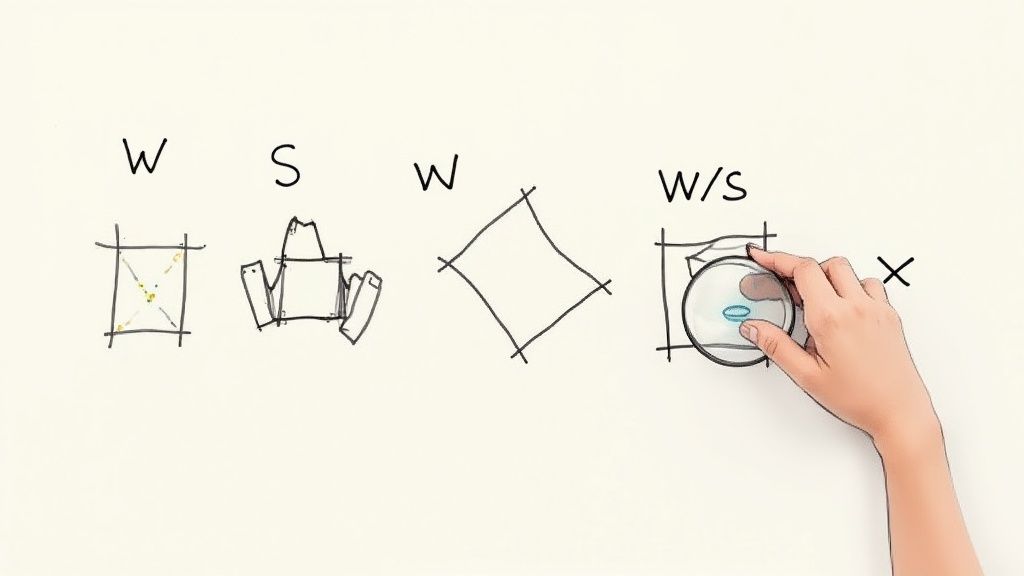
Upholstery Cleaning Codes At a Glance
This quick reference guide helps you understand the cleaning code on your furniture's tag, ensuring you use the correct method and avoid costly mistakes.
| Code | Meaning | Recommended Cleaner Type |
|---|---|---|
| W | Water-Based Cleaner | The fabric is safe for water-based cleaning solutions. |
| S | Solvent-Based Cleaner | Water is a no-go. Use a water-free, dry-cleaning solvent. |
| W/S | Water or Solvent | You have options. Both water-based and solvent cleaners are safe. |
| X | Vacuum Only | No liquids of any kind. Clean with a vacuum or brush only. |
Understanding your code is the first victory in your cleaning project. It takes the guesswork out of the equation and sets you up for a great result.
The All-Important Spot Test
Okay, so you've found the code and you have the right kind of cleaner. Don't get started just yet. There's one final, non-negotiable step: the spot test. This is your insurance policy against any unexpected reactions, like color bleeding or fabric damage.
Find a hidden spot—the underside of a cushion, the back of the skirt near the floor, or even the fabric on the frame under the cushions. Apply a tiny amount of your cleaning solution and let it dry completely. If you come back and see no discoloration, texture change, or other damage, you're officially good to go.
This simple five-minute test can save you from a costly, irreversible mistake. It's the one step professionals never, ever skip, and neither should you.
Ultimately, having the right tools on hand makes the whole process smoother. A good vacuum with an upholstery attachment, a few clean microfiber cloths, and a high-quality, fabric-safe cleaner are your best friends here. You can equip yourself for success with our curated selection of home care products, giving you the perfect arsenal for your mission.
And when you’re ready to find your next easy-to-clean centerpiece, our design experts at Miller Waldrop are here to help you choose the perfect sofa for your family's needs.
The Pre-Cleaning Ritual Pros Never Skip
Ask any professional cleaner, and they'll tell you the secret to a fantastic upholstery clean isn't just about the cleaning solution. It's the prep work. Honestly, it makes all the difference.
Skipping these initial steps is like trying to mop a floor you haven't swept. You'll just end up pushing the dirt around, creating a bigger mess that's way harder to deal with.
Before a single drop of cleaner touches your furniture, your mission is to get rid of all that dry soil. We're talking about the dust, crumbs, pet dander, and other tiny bits of debris that work their way deep into the fabric fibers. Pouring a cleaning solution on top of that mess just turns it into a grimy paste.
The Power of a Thorough Vacuum
Your vacuum is your best friend here. To really do this right, take off all the cushions. Grab the crevice tool attachment and meticulously work it into every seam, corner, and fold. This is exactly where all the forgotten crumbs and dust bunnies love to hide out.
Once you’ve tackled the nooks and crannies, switch over to the upholstery attachment. You know, the one with the small, flat head and a fabric strip. Go over every single surface of the furniture—the back, the sides, and even the frame where the cushions normally sit. Being methodical is key to lifting out as much of that deep-seated dirt as you possibly can.
This visual guide really nails down the essential prep work that sets you up for a flawless finish.
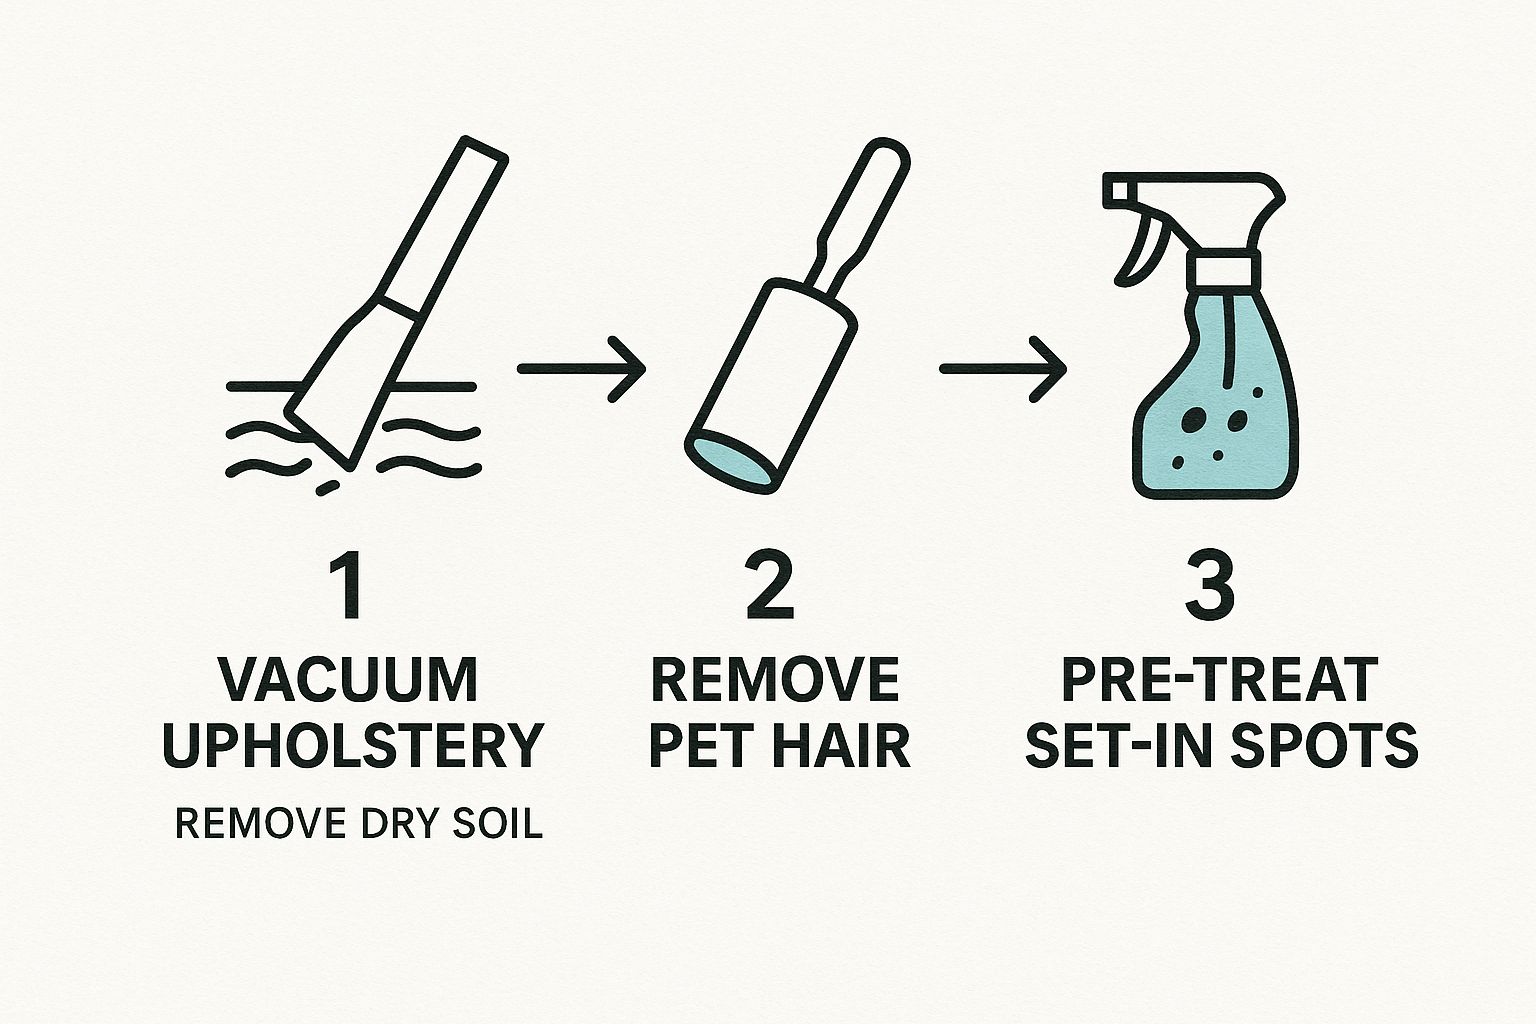
This simple, three-part process—vacuuming, getting rid of hair, and spot treating—is the foundation. It guarantees your cleaning solutions can get to work on the fabric itself, not just the surface-level gunk.
Tackling Pet Hair and Set-In Spots
Even the most powerful vacuum can struggle with stubborn pet hair. You can conquer this with a simple rubber glove. Just put it on, dampen it slightly, and wipe the surface in one direction. You'll be amazed at how the hair clumps together for easy removal. A squeegee or a good lint roller works wonders, too. This little step is a total game-changer if you have pets.
After the dry soil and hair are gone, you can finally turn your attention to any obvious spots. Pre-treating gives your spot cleaner a head start, allowing it to begin breaking down the stain before you do the main, all-over clean. This dramatically increases your chances of getting the stain out completely.
Before you get started with any solutions, it’s always a good idea to check out a detailed DIY guide that walks you through these crucial first steps.
When you master this pre-cleaning ritual, you're not just cleaning; you're restoring your furniture from the ground up for a result that looks truly professional.
Choosing the Right Cleaning Method for Your Fabric

Alright, you've prepped your furniture, and now we get to the satisfying part: the actual cleaning. This is where that initial detective work with the cleaning codes really comes into play. By matching your technique to the fabric, you’re not just wiping away a stain; you’re caring for your furniture the right way and protecting your investment for the long haul.
Following these specific instructions gives you the confidence to handle pretty much any fabric that comes your way. Let's turn this seemingly big chore into a simple, effective routine.
For Water-Safe Fabrics: Code W
If you found a "W" on the tag, you can breathe a little easier. These are the most common fabrics and are generally the most straightforward to clean. The trick is to use a gentle, water-based cleaner and, most importantly, to avoid soaking the fabric.
A fantastic DIY solution you can use is to mix about a teaspoon of clear, mild dish soap into a bowl of lukewarm water. Whisk it up to create a good amount of suds. Here's the key: you'll be cleaning with the foam, not the water itself. This little trick is crucial for preventing water spots and keeping mildew at bay.
- Grab a clean, white microfiber cloth and dip it just into the suds.
- Wring it out until it's almost dry—you want it barely damp.
- Gently blot the fabric, working in small sections. If you're tackling a specific stain, start from the outside and work your way in to prevent it from spreading.
- Once done, take a second cloth dampened with plain water to gently "rinse" away any soap residue.
- Finally, press a dry cloth firmly onto the area to soak up as much moisture as possible.
For Solvent-Only Fabrics: Code S
An "S" code means your fabric and water are not friends. Think of delicate materials like some velvets, silks, or certain vintage textiles. Water can cause irreversible damage like shrinking, browning, or nasty water rings. For these, you'll need a water-free dry-cleaning solvent, which you can typically find at hardware or home improvement stores.
Safety first when you're using solvents. Always make sure the room is well-ventilated. Open a few windows, maybe get a fan going. And never, ever use solvents near an open flame or heat source.
To apply it, put a small amount onto a clean, white cloth—never pour it directly onto the upholstery. Then, gently blot the affected area. These solvents are designed to evaporate quickly, which is why they work so well on sensitive fabrics without leaving moisture behind.
A growing focus on home hygiene has really shaken up the upholstery care industry. The global upholstery cleaning market was valued at an incredible USD 55.16 billion in 2022 and is expected to reach USD 83.5 billion by 2030, driven largely by our increased awareness of a healthy home environment.
Handling Mixed and Delicate Codes: W/S and X
The "W/S" code gives you some flexibility, but it's always best to err on the side of caution. While you can technically use either water-based or solvent cleaners, you can start with the gentlest method first. For a small spot, a mild solvent is often the safest bet. For a general refresh, a very lightly applied water-based solution can work wonders.
Now, for the "X" code. This is the most delicate of them all. The only safe cleaning method here is vacuuming with an upholstery attachment or light brushing with a soft-bristled brush. That's it. Don't use any liquid, foam, or solvent. Trying to clean an "X" code fabric with anything wet will almost certainly lead to shrinking or permanent stains. Your goal is simply to remove surface dust and crumbs. To get a better sense of why these fabrics are so particular, you can learn more by exploring our guide on everything you need to know about upholstery materials.
DIY vs Professional Upholstery Cleaning
Sometimes, a bit of elbow grease is all you need. Other times, it's best to leave it to the professionals who have the heavy-duty equipment and specialized knowledge. This table can help you decide which route is best for your situation.
| Factor | DIY Cleaning | Professional Service |
|---|---|---|
| Cost | Low (cost of cleaning supplies) | Higher (service fee) |
| Best For | Minor spills, fresh stains, regular maintenance | Deep cleaning, set-in stains, delicate fabrics |
| Equipment | Basic household items (cloths, vacuum, mild soap) | Industrial-grade hot water extractors, specialized tools |
| Effectiveness | Good for surface-level cleaning and small spots | Excellent for removing deep-seated dirt, allergens, and tough stains |
| Risk | Higher risk of damage (e.g., over-wetting, using the wrong solution) | Low risk, as pros are trained and insured |
| Time | Can be time-consuming depending on the job | Quick and efficient, saving you time and effort |
Ultimately, regular DIY maintenance can keep your furniture looking great day-to-day. But for that deep, restorative clean or a particularly stubborn stain, calling in a pro is a smart investment that can extend the life of your furniture.
How to Tackle Tough Stains on Upholstery

We've all been there. That slow-motion moment when a glass of red wine tumbles onto the new sofa. It’s a heart-stopping event, but it doesn't have to end in a permanent stain. The secret isn't some magic formula, but rather knowing what to do in those first critical minutes.
The most important thing to remember is this: blot, don't rub. Seriously. Rubbing a fresh spill only grinds the stain deeper into the fabric's fibers, making it a nightmare to remove and often damaging the upholstery itself. Grab a clean, white cloth and gently press down on the spill to absorb as much as you can.
Your Stain Removal Playbook
Different spills need different game plans. Once you know what you’re dealing with, you can choose the right weapon for the job.
For common culprits like red wine or coffee, you're racing against the clock. After blotting up the excess, try dabbing the area with a 50/50 mix of white vinegar and water. The mild acid in the vinegar is fantastic at breaking down the tannins. Just dab it on, blot with a dry cloth, and repeat until you see the stain lifting.
Grease and oil stains from things like pizza or salad dressing are a whole different beast. Water won't help here. Your first move should be to sprinkle cornstarch or baking soda directly on the spot. Let it sit for 15-20 minutes to draw the oil out of the fibers, then just vacuum it up. You can then tackle any remaining residue with a tiny drop of clear dish soap on a damp cloth.
Think of it this way: water and oil don't mix. That's why you need something like cornstarch to pull the oil out first before you can effectively clean the fabric underneath. It’s a simple trick that makes a huge difference.
Professional Secrets for Common Spills
For protein-based stains like mud or blood, always reach for cold water. Using hot water is a critical mistake, as it can essentially "cook" the protein, setting the stain for good. A bit of mild soap in cold water is your best friend here.
Ink can be intimidating, but it’s often manageable. Put a little rubbing alcohol on a cotton ball and gently dab—don't scrub—the mark. You should see the ink start to dissolve and transfer to the cotton ball. Hairspray can sometimes work in a pinch, too!
Here’s a quick cheat sheet you can use:
- Greasy Stains: Start with a dry absorbent powder like cornstarch.
- Coffee/Wine Stains: Use a 50/50 mix of white vinegar and water.
- Protein Stains: Always use cold water and a mild, clear soap.
- Ink Stains: Dab carefully with rubbing alcohol on a cotton ball.
This targeted approach is exactly what the pros do. It’s all about understanding the chemistry behind the stain and the cleaner.
With everyone spending more time at home, keeping furniture clean is more important than ever. The global upholstery and carpet cleaning market was valued at around USD 67.4 billion in 2025, and that number is on the rise. Keeping your upholstery fresh isn't just about appearances—it's about cutting down on allergens and dust mites in your home. You can find more details on the growth of the professional cleaning market and see just how big this trend is.
When you're faced with a truly stubborn stain or a delicate fabric you're nervous about, our team at Miller Waldrop is always here to help. You can also get ahead of future accidents by exploring our powerful yet gentle fabric care products designed to be your furniture’s best line of defense.
Drying and Protecting Your Freshly Cleaned Furniture
You've done the hard work, tackling the dirt and stains. Now comes the final phase, the one that really separates a good cleaning job from a great one. It's tempting to rush this part, but getting the drying process right is absolutely crucial.
Cutting corners here can lead to musty smells, watermarks, and even mildew deep inside the fabric. Patience is your best friend. Letting your furniture dry completely ensures all that effort pays off, leaving you with a piece that’s truly fresh and clean.
Speeding Up the Drying Process
The secret to a quick, thorough dry is simple: airflow. You want to get air circulating around every surface of the upholstery to help that moisture evaporate.
Start by cracking a few windows to get some fresh air moving through the room. Then, grab a couple of household fans and point them directly at the furniture. If you've got a ceiling fan, turn that on too.
For a real pro-level move, bring in a dehumidifier. Placing one in the room will actively pull moisture from the air and the fabric, which can dramatically cut down on drying time, especially if you live in a humid area.
It's worth noting that the cleaning industry is always evolving. Newer cleaning systems, including many battery-powered and automated ones, are designed to use much less water. This not only cleans effectively but also significantly shortens drying time. You can learn more about how low-moisture cleaning machines are changing the industry.
Applying Your Furniture’s Shield
Once you're 100% sure the upholstery is bone-dry—and I mean completely dry to the touch—it's time for the final protective step. This is where you give your furniture an invisible shield against future messes.
Applying a high-quality fabric protector creates a barrier that repels spills, keeping them from soaking deep into the fibers. Instead of instantly creating a stain, liquids will often bead up right on the surface, giving you precious time to grab a cloth and blot them away.
Think of it as an investment in your furniture's future. It’s an empowering way to guard against the inevitable accidents that come with kids, pets, or just a clumsy moment with a glass of red wine. Products like our Fabric Protector are perfect for arming your furniture against life's little mishaps.
This is all part of a smart, proactive maintenance routine. For more tips on keeping your home looking its best, be sure to check out our fall furniture maintenance checklist.
And when you're ready to find that next perfect piece for your home, our team at Miller Waldrop is here to help you choose beautiful, easy-to-maintain furniture that truly fits your lifestyle.
A Few Common Questions I Hear All the Time
Even after you've got a plan, a few questions always pop up. It's completely normal. Let's tackle some of the most common ones I get asked—clearing these up will give you that last bit of confidence to really master your home's upholstery care.
How Often Should I Actually Be Cleaning My Upholstery?
For everyday upkeep, a weekly vacuum is your best friend. It keeps that layer of dust and allergens from settling in.
When it comes to a real deep clean, like the methods we've just discussed, you'll want to tackle that every 12 to 24 months. That's a good benchmark for furniture that sees average use.
But let's be realistic—if you've got kids, pets, or someone with allergies in the house, your furniture is working overtime. In that case, I’d shorten the timeline to every 6 to 12 months. Staying on top of it like this doesn't just keep things looking fresh; it genuinely helps your furniture last longer.
Can I Just Use My Carpet Cleaner on the Sofa?
I get this one a lot, and my advice is to be extremely careful. The short answer is: probably not. It’s a risky move unless your machine has a dedicated upholstery attachment that the manufacturer specifically designed for furniture, and your fabric is rated "W" (meaning it’s safe for water-based cleaners).
The big problem is power. Carpet cleaners are built to blast dirt out of durable, flat carpets. They push out way too much water for most upholstery, which can cause colors to run, damage delicate fibers, or worse—lead to mildew and mold growing deep inside the cushions. If you're determined to try, test it on a hidden spot first and use the absolute lowest moisture setting you have.
Why Does My Upholstery Smell Funny After I Clean It?
That slightly musty, damp smell is almost always a sign of one thing: it got too wet and didn't dry fast enough. When fabric stays damp for too long, it becomes a perfect breeding ground for mildew.
The trick is to use as little liquid as possible from the start. After you’ve finished cleaning, get the air moving. Open up the windows, set up a few fans, and do whatever you can to speed up the drying time. A little pro tip: if you notice a slight odor developing, you can lightly mist the fabric with a 50/50 mix of white vinegar and water. The vinegar helps neutralize the odor as it finishes drying.
Of course, for a really deep-seated issue or a tricky fabric, sometimes the best move is to call in the experts. For those situations, it's worth consulting with professional upholstery cleaning services.
Here’s my go-to DIY solution for any water-safe (Code W) fabric: just a couple of drops of clear dish soap in a bowl of lukewarm water. The secret is to whip it up and use only the suds on your cloth, not the water itself. This gives you great cleaning power without soaking the fabric.
At Miller Waldrop, we believe your furniture should be beautiful, comfortable, and, most importantly, easy to live with. If you’re looking for a piece that can handle real life, our design experts would love to show you our incredible collection of performance fabric sofas and help you find the perfect one for your home.