A Guide to the Ideal Height of Lamp Over Dining Table
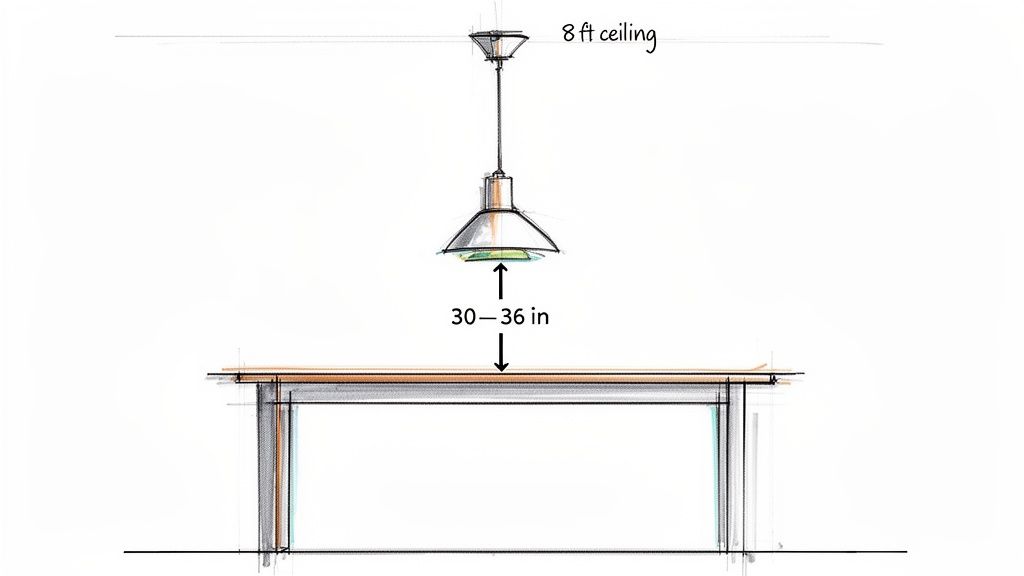
Hanging a light fixture over your dining table is one of the most impactful design choices you can make. The right height transforms your dining room from just a room into an inviting space where family and friends want to linger. To empower you to get this right, we're sharing the single most important number designers have relied on for decades: 30 to 36 inches. This is the ideal distance from the top of your table to the very bottom of the lamp.
Mastering this measurement is your first step to creating the perfect dining atmosphere. It's the key to avoiding harsh glare while ensuring conversation flows without a fixture blocking the view.
Why 30-36 Inches Is the Magic Number
This range isn't just a random suggestion; it's a time-tested sweet spot that creates an intimate pool of light, visually defining your dining area. At the same time, it’s high enough that it won't block anyone's view across the table, so you and your guests can connect without interruption.
This guideline became the standard back in the mid-20th century, right around the time Miller Waldrop first opened its doors in 1952. Homes were commonly built with 8-foot ceilings, and this measurement was the perfect fit. It ensures the light source is low enough to illuminate the table but high enough to avoid shining directly into your eyes.
A Pro Tip From Experience: The average seated person's eye level is about 42-48 inches from the floor. The 30-36 inch rule is your tool for keeping the bottom of the light fixture just above that line of sight, preventing direct glare while perfectly lighting the food and centerpiece.
This quick reference table breaks down the core principle for you.
Quick Reference Hanging Height Guide
This is the fundamental rule that works for most homes with standard ceiling heights. Think of it as your go-to starting point for creating a perfectly lit space.
| Measurement | Standard Rule | Primary Reason |
|---|---|---|
| Distance from Tabletop | 30 to 36 inches | Prevents blocking sightlines across the table and avoids glare for seated guests. |
| Best for Ceiling Height | 8 feet | This is the classic pairing for which the rule was originally established. |
Remember, this is a guide, not a rigid law. You can adjust this for taller ceilings, but this measurement is the tool that helps you get it right a majority of the time.
Putting the Rule Into Practice
The 30-36 inch range is your North Star, especially for the common 8-foot ceilings we see all over West Texas and New Mexico. Before you or your electrician make the final cut, it’s always a good idea to do a quick visual check.
Have a friend hold the fixture at the proposed height. Take a few steps back, sit down at the table, and walk around it. Does it feel right? Does it block your view of the person across from you? This simple dry run empowers you to make the final call and avoid any second-guessing later.
Mastering this one measurement is the first step toward a beautifully designed dining space. And if you're still looking for the perfect table to go under that new light, our ultimate guide to dining table heights can help you complete the picture.
Choosing a Fixture with the Right Proportions
Okay, you’ve figured out the perfect height for your dining room light. The next piece of the puzzle is getting the scale right. This is where you can truly make your room come together. A fixture that’s too small looks timid and gets completely lost, while one that's too big can feel like it's bearing down on you while you eat.
The goal is to find that "just right" balance that makes the fixture look like it was always meant to be there. You don’t need to be a designer to nail this—you just need a couple of tried-and-true guidelines to help you choose the perfect fixture for your space.
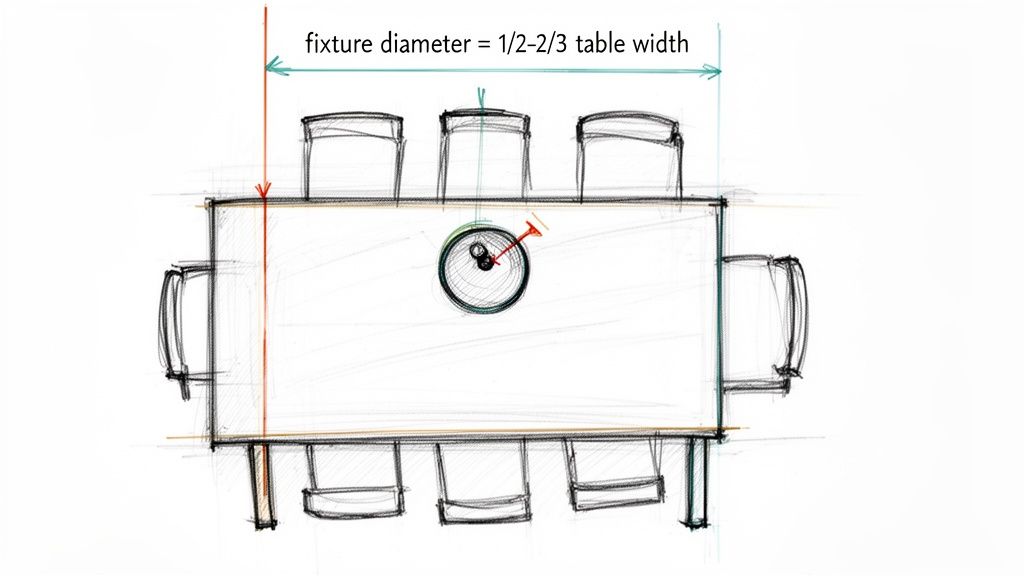
Key Takeaway: To achieve a balanced look, your light fixture's diameter should be one-half to two-thirds the width of your table. A fixture that is too large or too small can disrupt the room's visual harmony.
Finding Your Fixture's Perfect Size
Let’s put this into practice. These rules are your tools to succeed, whether you're designing a cozy breakfast nook in Hobbs or a sprawling formal dining room in Lubbock.
For Round Tables: This one’s pretty straightforward. Just measure the diameter of your table at its widest point. Your light fixture should have a diameter that's one-half to two-thirds of that number. So, for a 48-inch round table, you can confidently shop for a fixture between 24 and 32 inches wide.
For Rectangular or Oval Tables: You’ll use the same principle, but apply it to the table's width. If you have a rectangular table that’s 42 inches wide, a fixture between 21 and 28 inches wide will feel properly scaled. For length, just make sure you leave at least 6 inches of open space from the end of the fixture to the end of the table on both sides. This prevents it from looking cramped.
These aren't just arbitrary numbers; they're rooted in design history. The idea of not letting a fixture overhang the table comes from 19th-century lighting practices, adapted for modern homes. It’s a principle that still holds up—a 2026 Houzz report even found that 92% of surveyed homeowners felt that properly scaled lighting significantly improved a room’s look and feel. If you want to dive even deeper, this comprehensive dining room light fixture guide is packed with useful visuals.
From Theory to Your Shopping Cart
Now you have the numbers you need to shop with confidence. You can walk into a showroom or browse online knowing exactly what size range will work for your space.
Imagine spotting a beautiful chandelier from our Hooker Furniture collection and knowing, before you even click "add to cart," that its proportions are a perfect fit. That knowledge is the tool that takes all the guesswork out of the equation.
Of course, if you ever feel stuck or just want a second opinion, our team at Miller Waldrop is always here to help. We are your partners in design, ready to double-check your measurements—or even come out to your home—to make sure you find the perfect piece to win the day.
How Your Ceiling Height Changes the Rules
That trusty 30-to-36-inch rule for hanging a light fixture is a great baseline, but it’s built for a standard 8-foot ceiling. What happens when you’re dealing with the taller, vaulted, or sloped ceilings we see so often in West Texas and New Mexico? You’ve got to know when to bend the rules to make your design triumph.
If you don’t account for that extra height, your beautiful new fixture will look like it’s just floating up there, totally disconnected from the dining table it’s supposed to anchor. It’s a really common mistake, but thankfully, you now have the tools to fix it.
The Simple 3-Inch Rule for Taller Ceilings
Here’s the trick that empowers you to master any ceiling height: for every foot of ceiling height you have above 8 feet, add an extra 3 inches to the hanging height of your fixture. It’s a simple adjustment that makes a world of difference, ensuring your light feels grounded and intentional, no matter how high your ceilings soar.
Let’s walk through a quick example. Say you have a dining room in a Ruidoso Downs home with a 10-foot ceiling.
- Your ceiling is 2 feet taller than the standard 8 feet.
- The adjustment needed is 2 feet x 3 inches, which equals 6 inches.
You’d add that 6 inches to the original 30-to-36-inch range. Your new target hanging height becomes 36 to 42 inches above the tabletop. This slight drop creates a much more cohesive look, visually connecting the fixture to the table and the rest of the room.
This isn't just a casual tip; it's a core principle designers use to maintain visual harmony. For the 9- and 10-foot ceilings that are so common now, you’ll want to be precise. A 9-foot ceiling usually calls for a 33-36 inch clearance, while a 10-foot ceiling looks best with the fixture 36-40 inches from the table. This keeps the light from feeling too high or too low.
Why This Adjustment Matters So Much
Here in West Texas and Southeastern New Mexico, where vaulted ceilings grace about 25% of homes, applying this rule is crucial for avoiding that dreaded "floating fixture" effect. When a lamp is hung too high, the light scatters and loses its impact, which can reduce the actual illumination on your table by as much as 40%. On the other hand, hang it too low in a tall room, and it just looks awkward and blocks everyone’s view across the table.
Mastering this simple adjustment is especially important when you're working with challenging architecture. You can get more ideas on how to make the most of all that vertical space with our guide on decorating walls with high ceilings.
Think of these guidelines as your toolkit for solving this specific design problem. Finding the perfect light is only half the job—hanging it with confidence is what really makes the room sing. And if you ever want a second opinion, our design experts in Lubbock, Hobbs, and Ruidoso are always here to help you get it just right.
Practical Steps for Measuring and Placement
Alright, you’ve got the rules of thumb for height and scale down. Now comes the part where you turn those numbers into a perfectly placed fixture. This hands-on prep work is what empowers you to achieve a truly great result. Let’s walk through how you can get it just right.
First, and this is a big one, you need to center the fixture over your table, not necessarily in the middle of the room. This ensures your dining set is the star of the show, creating a beautiful, balanced vignette.
Getting the Placement Just Right
To find your true center, start by measuring the length and width of your tabletop. Find the halfway point of each measurement and mark where they intersect—that’s your target. From that spot, you can use a plumb bob or a laser level to shoot a point straight up to the ceiling. This is where the center of your light fixture’s mounting plate, or canopy, will go.
Before you drill any holes, though, you absolutely must do a visual dry run. Grab a tape measure and a friend for this.
- Have your helper hold the fixture itself (or a cardboard cutout of a similar size) at the height you calculated.
- Step back. Walk around the table and look at it from every angle.
- Most importantly, sit down in the chairs. Can you see the person across from you? Does the light feel like it's looming or too far away?
This simple test is invaluable. It’s so much easier to adjust a tape measure than it is to patch a ceiling and reinstall a fixture. This is also the perfect time to make sure you have enough chain or cord to hang the light at your desired height, which is especially important in rooms with taller ceilings.
Trust me on this one—even a one-inch adjustment can completely change the feel. Taking five minutes to test the height visually gives you the confidence that you're avoiding a placement that feels "just a little off" for years to come.
Accounting for High Ceilings
This visual breaks down how to adjust your hanging height when you’re working with ceilings taller than the standard 8 feet.
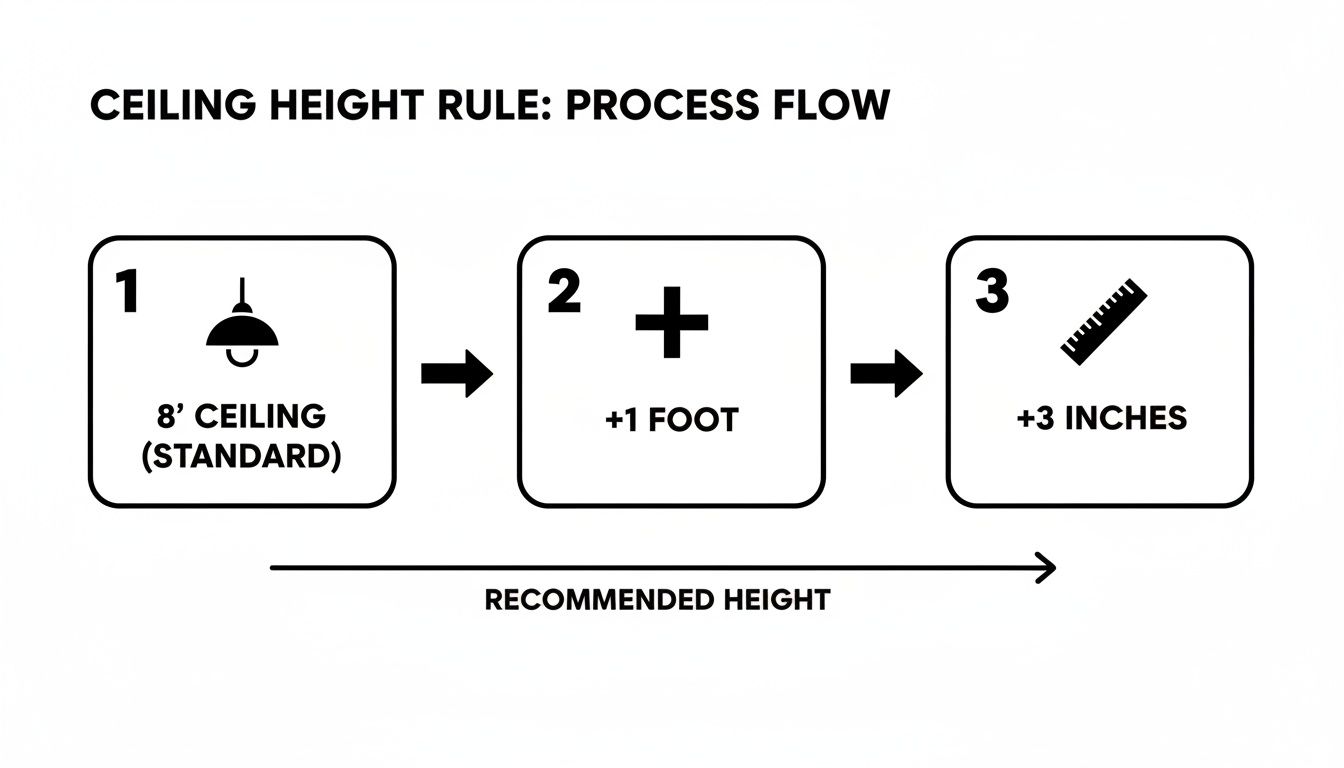
The general rule is pretty simple: for every foot of ceiling height above 8 feet, you’ll want to add about 3 inches to the hanging height of your fixture. When you're dealing with vaulted or extra-tall ceilings, understanding the mechanics of choosing the right downrod for overhead fixtures is key to getting the height right while ensuring the fixture is properly supported.
While we always recommend hiring a licensed electrician for the actual wiring, taking charge of these placement decisions puts you in the driver's seat of your design. It ensures the professional hangs your light exactly where it will look its absolute best.
Finessing the Finer Points of Your Design
Getting the height of your dining light right is the first step, but the details are what truly make a room sing. This is where you move from just lighting a space to creating a real atmosphere. These are the tools that will make your dining room feel polished, intentional, and uniquely yours.
If you take only one piece of advice, it should be this: install a dimmer switch. Nothing else gives you so much control over the mood. You can go from bright, functional light for family game night to a soft, intimate glow for dinner, all with a simple slide. It’s the easiest, most effective way to make your dining room work for every part of your life.
The Bulb and the Body of the Fixture
The bulb you choose makes a huge difference, too. For that cozy, inviting restaurant feel, look for bulbs with a warm tone, around 2700K. If you prefer a crisper, more modern light, anything over 3000K will feel whiter and more energetic. Just a heads-up for those using newer LED fixtures: make sure you're using the right kind of dimmer. Checking for LED bulb dimmer compatibility is a quick step that saves you from annoying flickering or buzzing later on.
Then there’s the fixture’s visual weight. This has nothing to do with how many pounds it is, but everything to do with how heavy it looks. A fixture made of dark, solid metal feels much more substantial than one made of glass and thin wires, even if they're the same size. An airy, open-frame fixture keeps the space feeling light, while a more commanding piece, like the Signature Design by Ashley 'Brossling' 5-Light Chandelier, can beautifully anchor the room and make a dramatic statement.
Common Missteps to Watch Out For
You can sidestep the most common hangups by thinking ahead. Here's what to look out for:
- Creating a Visual Barrier: A fixture that’s too bulky or hung too low can feel like a wall in the middle of your table. Always do a "sit test" from every chair to make sure no one's view is blocked.
- Forgetting Where the Table Actually Sits: Your light should be centered over your table, not necessarily the geometric center of the room. This is especially critical in open-concept homes where the "dining room" is more of a zone than a separate space.
- Ignoring the Rest of the Room: A light fixture doesn't exist in a vacuum. It needs to feel connected to the other elements. A great way to tie everything together is by coordinating it with your rug. Our guide on choosing the right dining room rug size under your table is a fantastic resource for creating that cohesive feel.
Paying attention to the small stuff is what takes a room from good to great. You're not just hanging a light; you're crafting an experience that feels right for every occasion, from a loud family dinner to a quiet weeknight meal.
When you nail the height and layer in these thoughtful details, you create a dining space that’s not only beautiful but also perfectly functional for your family. If you're looking for that perfect fixture to complete your vision, our design experts at our showrooms in Lubbock, Hobbs, and Ruidoso Downs are here to provide the tools and guidance you need.
Tackling Your Top Dining Room Lighting Questions
You’ve got the basic rules down, but what about those specific, tricky situations that always seem to pop up? In our experience, a few questions come up again and again. Here are the answers our design team gives every day to help you get your lighting just right.
What if My Junction Box is Off-Center?
It’s a classic problem: you find the perfect chandelier, but your electrical box is nowhere near the center of the table. Don't worry, this happens all the time and you don’t have to settle for an awkward-looking fixture.
The cleanest solution is often to have an electrician move the box. It’s a straightforward job for a professional and guarantees a perfect, centered placement.
If that’s not an option, a swag hook is your best friend. This technique involves draping the fixture's chain or cord from the existing box over to a hook installed directly above the table's center. It adds a bit of an eclectic, custom feel. You could also choose a fixture with a very large canopy, like a linear chandelier or some multi-light pendants, which are designed to cover a wider area and can cleverly mask an off-center box.
Can I Use Multiple Pendants Over a Long Table?
Not only can you, but you absolutely should! Using two or three smaller pendants is a fantastic way to light a long, rectangular table and create a beautifully balanced and modern look.
Here's the simple math to get the spacing perfect: divide your table's length by the number of pendants you're using, plus one. For example, if you have an 80-inch table and two pendants, you’ll hang one pendant 26.6 inches in from each end of the table. This leaves an equal space between the pendants and at both ends.
This simple calculation is a go-to designer trick. It ensures the light is evenly distributed across the entire table—no more dark spots on the ends. The result is a high-end, custom-designed feel.
How Do I Choose a Light for a Round vs Rectangular Table?
Let the shape of your dining table be your primary guide.
For round tables, you almost always want a single, central fixture that complements the circular shape. Think about a classic round chandelier, a drum pendant, or one dramatic statement piece. This creates a natural focal point that echoes the table's form.
For rectangular tables, your options open up. A long linear fixture or an oval chandelier will mirror the table's length and provide excellent coverage. Alternatively, a series of two or three smaller pendants, as we just discussed, is a fantastic way to light the entire surface.
At Miller Waldrop Furniture & Decor, we believe that the right information can empower you to turn a good design into a great one. Now that you have the know-how to tackle any lighting challenge, you can truly bring your vision to life. If you're ready to find that final piece that helps you win the day, we invite you to explore our curated selection of dining room lighting and furniture.