A Guide to Attaching a Headboard to the Wall: Secure, Stylish, Simple

Attaching your headboard directly to the wall is a pro-level technique you can use to make a huge difference in your bedroom. It’s what gives a space that solid, high-end, and intentional feel. By securing the headboard to the wall studs with hardware like French cleats or flush mounts, you can completely eliminate the wobble you often get when it’s only attached to the bed frame. This is the go-to method for any headboard that’s heavy, oversized, or has a unique floating design, giving you the power to create a truly custom look.
Why Wall-Mounting Is Almost Always the Best Option
Ever look at a designer bedroom and wonder how everything looks so polished and put-together? The secret is often something you can achieve yourself: the headboard is attached firmly to the wall. It’s a small change that elevates the entire room, turning your bed into the true focal point it was meant to be.
Think of it this way: mounting a headboard isn't just about looks. It's about empowering you to create a more serene and functional space. A properly secured headboard won't shift, rattle, or bang against the wall every time you fluff your pillows.
Instead of depending on a potentially flimsy bed frame, the headboard becomes an integrated part of your room’s structure. This creates an unshakeable, cohesive unit that feels permanent and thoughtfully planned—a victory for your design vision.
The Magic of Stability and Style
The biggest win here is unmatched stability. This is especially important for those gorgeous, oversized, or heavy custom headboards that a standard metal frame just can't handle. By transferring all that weight to your wall studs, you create a rock-solid connection that can hold up practically anything.
Here are a few more benefits you'll achieve:
- No More Annoying Noises: You can say goodbye to wobbling or rattling sounds when you get in and out of bed.
- Wall Protection: You can prevent the headboard from scraping, scuffing, or denting the drywall behind your bed over time.
- Achieve a 'Floating' Look: This is how you create that clean, modern aesthetic where the headboard appears to hover, making the room feel more open.
- Supports Any Headboard Style: You gain the strength needed for heavy materials like solid wood, reclaimed barn doors, or elaborate upholstered designs.
Creating Your Bedroom's Anchor
A wall-mounted headboard is more than just furniture; it becomes the anchor for your entire bedroom's design. It sets the tone and influences everything from where you place your nightstands to how you arrange your wall art. It immediately gives the space a sense of permanence and thoughtful detail.
By securing your headboard to the wall, you're not just assembling furniture—you're making a deliberate design choice that enhances both the look and the feel of your bedroom. It’s a foundational step toward building your own peaceful and stylish retreat.
If you're looking for ways to make this technique work in your room, our guide on inspiring bedroom layout ideas is a great place to start visualizing the possibilities.
And if you need help finding the perfect piece to anchor your dream bedroom, our design experts at Miller Waldrop are here to provide the tools and guidance you need. We can help you select a headboard that not only fits your style but is also perfect for a secure, beautiful wall-mounted installation.
Selecting The Right Hardware For The Job
When it comes to wall-mounting your headboard, the hardware you choose is your most powerful tool. It’s the single most important decision you'll make in this entire project. Get it right, and you’ll achieve a secure, professional-looking installation. Get it wrong, and you're looking at a wobbly headboard or, even worse, a damaged wall.
Your final choice boils down to a few key factors: your headboard's weight, the type of wall you're working with, and the look you're trying to achieve. Let's break down the most common options so you know exactly what tools you need to win the day.
Comparing Your Mounting Options
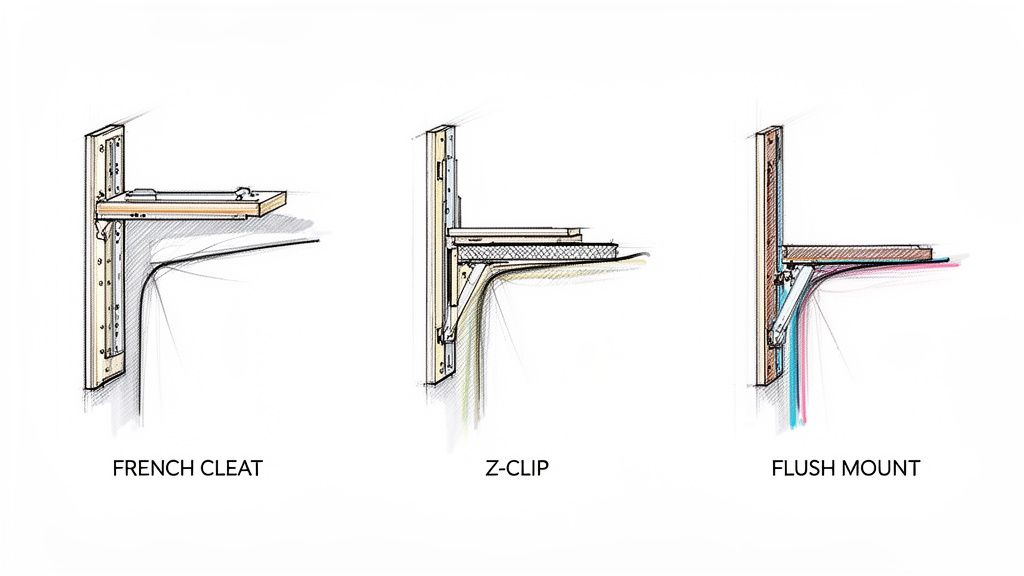
Each mounting system is designed for a specific challenge. Think of a French cleat as the heavy-lifter of the group. It’s a brilliant system of two interlocking angled brackets—one goes on the wall, the other on the headboard. They create an incredibly strong connection that spreads the weight out, making it the champion choice for anything heavy or oversized.
If you want your headboard to sit closer to the wall for a more built-in look, Z-clips (or Z-hangers) are a fantastic option. They work on a similar interlocking principle as a French cleat but are much slimmer. They’re perfect for most medium-weight headboards where you want to minimize that gap between the headboard and the wall.
For lighter, more decorative headboards, simple flush mounts are often all you need. These are small, interlocking metal plates that are easy to install and stay completely hidden from view. While they don't have the brawn of a cleat system, they provide plenty of support for a lightweight piece.
Expert Tip: To guarantee a successful project, always choose a mounting system rated to hold at least double the weight of your headboard. This isn't just a suggestion—it's your safety margin. It accounts for any accidental bumps or shifting over time and ensures your headboard stays put.
Matching Hardware To Your Wall Type
The best bracket in the world is useless if it’s not properly secured to your wall. That’s why you absolutely have to know what you’re drilling into.
Most modern homes use drywall, which means you’ll need to locate the wooden studs behind the plasterboard and anchor your hardware directly into them. For older homes with plaster and lath walls, you'll still want to find a stud, but be aware that plaster can be brittle. If a stud isn’t in the perfect spot, you’ll need to use anchors specifically designed for plaster.
And if you’re dealing with masonry—like brick or concrete—you’ll need to bring out the heavy-duty tools. A hammer drill, along with masonry-specific screws and anchors, will be required to get a secure grip.
Knowing how to properly anchor heavy objects is a skill every homeowner should have. The principles in this guide to hanging heavy items like mirrors safely are spot-on for this project and will give you extra confidence.
Headboard Mounting Hardware Comparison
To make your decision a little easier, here's a quick look at the most common hardware options. This should help you quickly pinpoint the right system for your headboard's weight and your own DIY comfort level.
| Hardware Type | Best For | Weight Capacity | Installation Skill Level |
|---|---|---|---|
| French Cleat | Heavy, oversized, or custom headboards | High (up to 200+ lbs) | Intermediate |
| Z-Clips | Medium-weight headboards, low-profile look | Medium (up to 75 lbs) | Beginner |
| Flush Mounts | Lightweight, decorative headboards | Low (up to 50 lbs) | Beginner |
Ultimately, taking a few extra minutes to choose the right hardware makes all the difference. You'll end up with a secure, stylish installation that looks like it was done by a pro and gives you total peace of mind.
Getting Your Space Ready for Installation
Any successful project starts long before you drill the first hole. You'll find that proper prep is the secret ingredient that turns a potentially frustrating job into a smooth DIY win. Taking a few moments to clear your space and gather your tools means that when you’re ready to get started, you can move forward with confidence.
Think of it as setting the stage for your success. A little bit of planning upfront prevents a lot of headaches later, protecting your walls, floors, and furniture from accidental damage. It's the difference between a frustrating afternoon and a finished project you can be proud of.
Get Your Tools Together
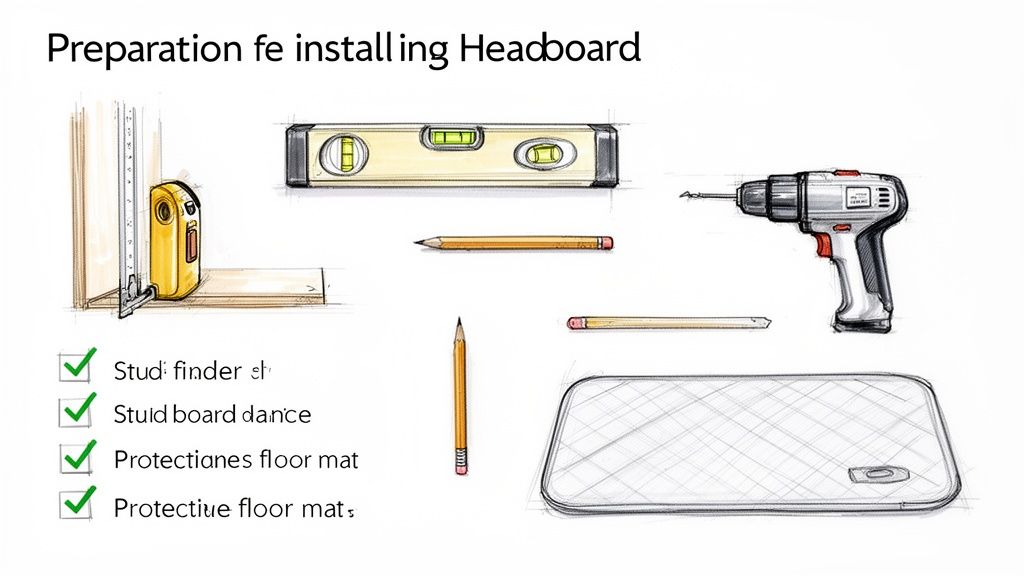
First things first: let's get your toolkit in order. There’s nothing worse than getting halfway through a project only to realize you’re missing the right drill bit. Having everything you need within arm's reach is the key to staying in the zone and executing your plan flawlessly.
Here’s a quick checklist of the essentials for your mission:
- A Reliable Stud Finder: This is a must-have. You absolutely need to anchor into the strong, structural part of your wall, and this is the only way to be sure where that is.
- A Good Level: It doesn't matter if it's a classic bubble level or a fancy laser one. Precision is what separates a DIY job from a professional one.
- Power Drill & Assorted Bits: Make sure you have the right bits for drilling pilot holes and for driving whatever screws or bolts you're using.
- Measuring Tape: Accuracy is everything. The old carpenter’s rule—measure twice, cut once—definitely applies here.
- Pencil or Painter's Tape: Perfect for marking your drill spots without leaving a permanent mark on the wall.
Having these tools ready to go transforms this project from a vague idea into a clear, manageable plan.
Create a Safe, Clean Work Area
With your tools at the ready, it's time to prep the room itself. Carefully pull your bed and any nightstands away from the wall. You'll want plenty of space to move around, measure, and level without feeling cramped.
Don't forget to protect your floors. A drop cloth or even an old blanket will do the trick, saving you from potential scratches and a messy cleanup from drywall dust.
Before you drill, it's a really good idea to have a solid understanding of framing in construction. Knowing what's behind the wall is the foundation of a secure installation and helps you avoid costly mistakes.
Creating a personalized, stable bedroom is a trend that's here to stay. In fact, the global headboard market was valued at USD 2.9 billion in 2023 and is projected to hit USD 4.6 billion by 2033. People want beautiful, well-designed spaces, and by tackling this yourself, you're part of that movement.
If you’re still searching for the perfect piece to complete your vision, you can explore the curated selection at Miller Waldrop Furniture & Decor. Our team can help you find a headboard that inspires you, setting you up to create the stylish, secure bedroom you deserve.
Time to Mount Your Headboard
Alright, this is where your planning and prep work really come to life. You've got your tools, you've cleared the space, and now it's time to turn your vision into a rock-solid, beautifully mounted reality. Let's walk through it together, step-by-step, so you feel confident you're doing it right.
The whole point here isn't just to get the headboard on the wall. It’s to empower you to create a secure, perfectly positioned centerpiece for your room—something that looks professional and gives you peace of mind.
The Art of Perfect Placement
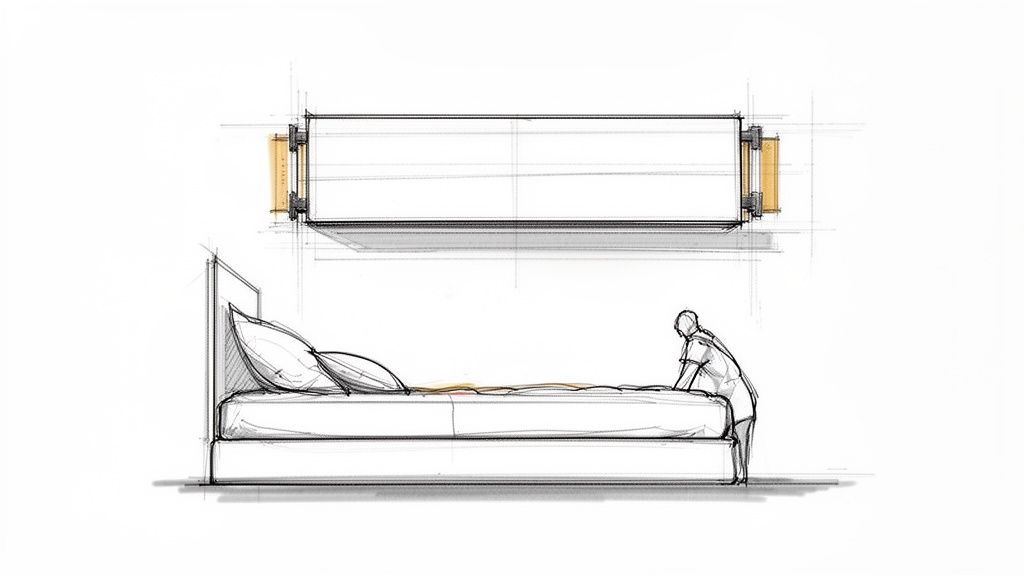
Before a single hole is drilled, you need to nail down the height. This is less about hard rules and more about what looks and feels right for your bed. The most common mistake people make is hanging the headboard too high, which leaves a weird gap where your pillows constantly try to escape.
To find that perfect height, go ahead and stack your pillows against the wall just like you would for a good night's sleep or a late-night reading session.
- Factor in Your Mattress: The height of your mattress is your primary guide. A plush pillow-top will sit much higher than a low-profile memory foam mattress.
- Don't Forget the Pillows: You want the headboard to provide a backdrop, not get completely hidden behind your shams and pillows.
- Close the Gap: As a general rule, aim to position the bottom edge of the headboard about 2 to 4 inches below the top of your mattress. This anchors it visually and stops that annoying pillow slippage.
Once you have an idea, use a measuring tape and pencil to lightly mark a horizontal line on the wall. Take a step back, look at it from the doorway, and make sure you love it before you commit.
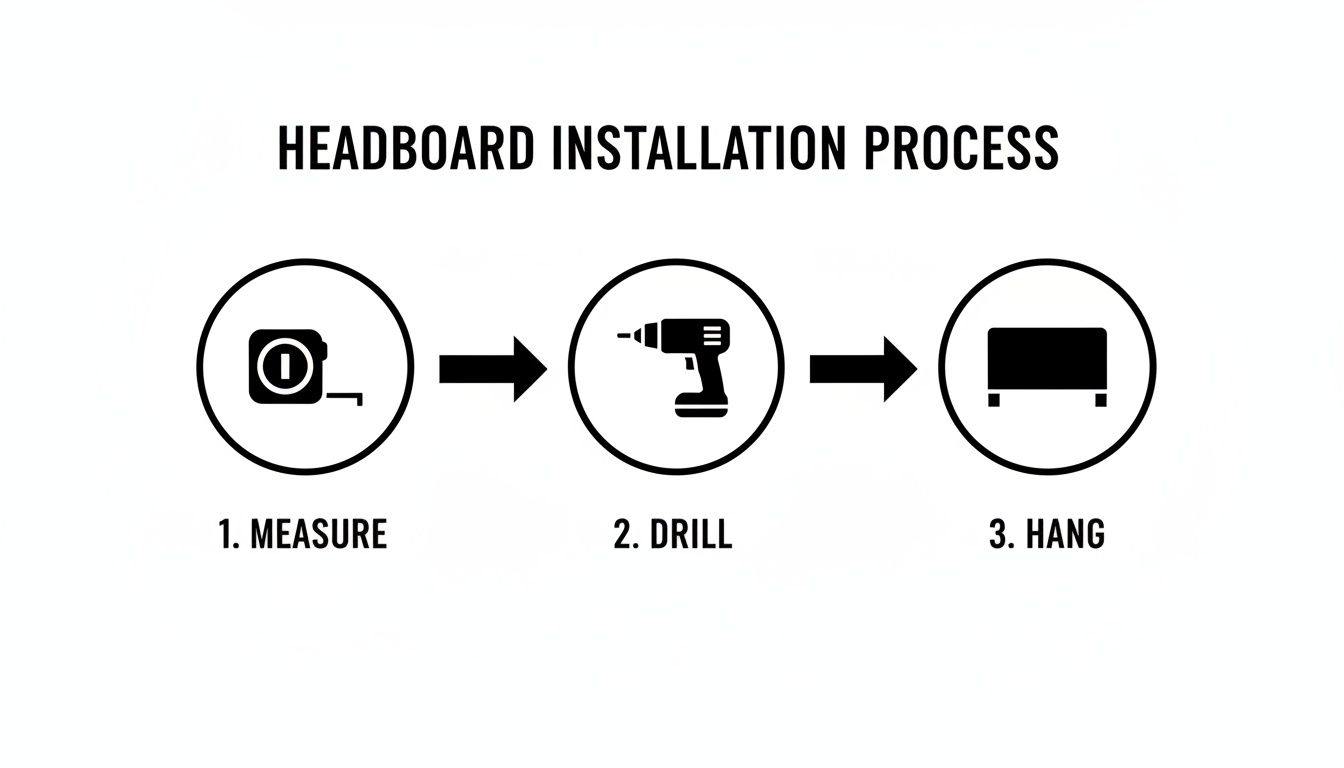
Finding and Marking Your Studs
Don't even think about skipping this part. This is the most critical step for a secure installation. The studs are the wooden framework inside your walls, and they're the only things you can trust to hold the weight of your headboard for the long haul.
Grab your stud finder and glide it slowly across the wall, just above the height line you marked. When it beeps or flashes, you've found your anchor point. Mark the spot with your pencil. In most modern homes, studs are spaced 16 inches apart, but don't be surprised if your older home has different ideas. You'll need to locate at least two of them for a solid mount.
After marking the center of each stud, use your level to draw a faint vertical line. Where this vertical line crosses your horizontal height line—that’s your exact drilling spot.
Think of this as more than just a set of instructions. By taking the time to measure correctly and locate studs, you're building a foundation for a flawless installation that will last for years.
Drilling and Attaching the Hardware
With your drill points perfectly marked, it’s time to get to it. Start by drilling a pilot hole at each mark. This is a smaller-diameter hole that guides the main screw, preventing the wooden stud from splitting and making it ten times easier to drive the screws in straight.
Now, you can attach the wall-side hardware—whether it’s a bracket or one half of a French cleat. Line it up with your pilot holes and put your level on it one last time to double-check that it’s perfectly horizontal before you fully tighten the screws.
Next up, you'll attach the matching piece of hardware to the back of the headboard itself. Measure twice, attach once! You need this piece to align perfectly with the hardware on the wall. This is a great time to call in a friend; an extra set of hands makes holding things steady much easier.
With a helper, carefully lift the headboard and guide the two pieces of hardware together until they lock into place. It should feel snug and secure. Step back and take it all in—you just successfully attached your headboard to the wall!
If you're still looking for that stunning centerpiece for your project, you can explore our beautiful collection of bedroom furniture at Miller Waldrop. Our design team would be thrilled to help you find the perfect piece to make your bedroom a true sanctuary.
Advanced Tips for a Professional Look
So, you've got the basics down for attaching a headboard to the wall. Now it's time to elevate your project from "good enough" to "flawlessly professional." This is where you can tackle those tricky situations like thick baseboards, walls that aren't perfectly plumb, or wrestling with an oversized, custom headboard.
Getting these details right is what will make your final result look seamless and intentional. It’s about more than just hanging something on the wall; it's about truly integrating a beautiful piece of furniture into your space.
Let’s walk through a few pro-level techniques to help you handle those common challenges.
As you can see, a methodical approach is everything. Accuracy at each stage prevents headaches later.
Working Around Obstacles
One of the most frequent hurdles you might encounter is a thick baseboard. It creates an awkward gap at the bottom, forcing the headboard to tilt forward instead of sitting flush against the wall. The fix is actually pretty simple: use a spacer.
- Grab a piece of wood, often a 1×3 or 1×4 will do the trick, and cut it to the same length as your mounting hardware.
- Paint the wood to match your wall. This little step makes the spacer practically invisible once everything is installed.
- Fasten the spacer directly into the wall studs, and then mount your headboard's hardware right onto the spacer.
Problem solved. This simple trick brings the mounting surface out, creating a perfectly vertical plane for a secure, professional-looking installation.
The Rise of Integrated Bed Head Panels
Headboards are evolving far beyond simple decorative panels. There's a huge trend toward multi-functional designs that incorporate lighting, floating nightstands, and even USB charging ports, giving you more control over your space.
This isn't just a niche idea; it's a rapidly growing market. The global bed head panel market is expected to jump from USD 0.33 billion in 2024 to USD 0.64 billion by 2035. It’s all about combining form and function. Brands we carry at Miller Waldrop, like Hooker Furniture and Flexsteel, are leading the way with these smart, integrated designs you can incorporate into your home.
Managing Heavy and Custom Headboards
What if your headboard is a statement piece—something heavy like reclaimed wood or a custom upholstered design? In that case, your number one priority has to be stability. Don't even think about using standard picture hangers.
For any headboard weighing over 100 pounds, a high-quality French cleat system is your best ally. This is the safest, most reliable method. It distributes the weight across several wall studs, giving you incredible support and peace of mind.
And if you’ve invested in a gorgeous wooden headboard, you’ll want to keep it looking its best. For some great tips, you can take a look at our guide on how to care for wood furniture.
With these pro tips in your back pocket, you’re ready to tackle any installation challenge. Of course, if you’d rather leave it to the experts or need help finding that perfect piece, our design team at Miller Waldrop Furniture & Decor is always here to help you succeed.
Find the Perfect Headboard for Your Project
You’ve got the know-how to tackle a wall-mount installation like a pro. Now for the fun part: finding the headboard that will completely transform your space. This is where your unique style gets to shine.
Choosing the right headboard is what turns a simple bedroom refresh into a thoughtfully designed retreat. It’s the anchor that pulls everything else together.
At Miller Waldrop Furniture & Decor, we believe furniture is more than just objects in a room. It's how you craft a home that feels uniquely yours. A headboard isn’t just a backrest; it’s a statement piece that speaks to your taste, whether that’s clean and modern, cozy and rustic, or classically elegant.
The Foundation of Your Dream Bedroom
Picking the perfect headboard goes beyond just looks. It’s about getting the scale right for your room and finding a piece that complements the height of your mattress. One of the best things about knowing how to attach a headboard to a wall is the freedom it gives you. You can confidently choose those heavier, beautifully crafted pieces without worrying if your bed frame can handle the weight. A whole new world of design possibilities just opened up for you.
If you want a little more guidance on making sure style, size, and function all align perfectly, check out our in-depth guide on how to choose bedroom furniture. It’s packed with tips to help you make a choice you’ll love for years to come.
Your bedroom is your sanctuary. A great headboard doesn't just complete the look; it grounds the entire room and creates a focal point that is both stunning and deeply personal. It's the hero piece of your design story.
Take the gorgeous Magnolia Manor Upholstered Headboard, for instance. It has this timeless, antique feel with beautiful upholstery that immediately draws the eye. Its solid construction makes it a perfect candidate for a secure wall-mount, so you can make it the star of your room for years to come.
Let Us Help You Create Your Perfect Space
If you’re in the Lubbock, Hobbs, or Ruidoso Downs area, think of our professional design team as your creative partner. We’d love to walk you through our collections and help you find that perfect piece that fits your style, your room, and your new wall-mounting skills.
Let's build that beautiful, serene bedroom you've been dreaming of, together. Visit us today to find the perfect tools for your design victory.
Common Questions About Mounting Headboards
Even the best-laid plans can hit a snag. When you're in the middle of a project like mounting a headboard, a few questions are bound to pop up. Let's tackle some of the most common ones we hear from customers, so you can handle any little surprises with confidence.
These are the real-world tips that will make the difference between a good result and a great one.
What Is the Best Height to Mount a Headboard?
This is probably the most-asked question, and for good reason—height is everything for both aesthetics and comfort. If you mount it too high, you create that dreaded gap where your pillows vanish behind the bed. Too low, and your beautiful headboard gets completely swallowed by pillows and shams.
A solid rule of thumb is to place the bottom of the headboard about 2 to 4 inches below the top of your mattress. This simple measurement keeps your pillows where they belong while making sure the headboard stands tall as the stunning focal point it’s meant to be. It’s a small detail that creates a polished, fully integrated look.
How Do I Mount a Headboard with Thick Baseboards?
Ah, thick baseboards. They look great, but they can make a headboard tilt forward awkwardly instead of sitting flush against the wall. Don't worry, the fix is surprisingly simple: use a spacer.
- Grab a small piece of wood, like a 1×3 or 1×4, and cut it to match the width of your headboard's mounting brackets.
- Paint the wood spacer to match your wall. Once it's up, it will be virtually invisible.
- Attach the spacer directly to the wall studs, and then screw your mounting hardware right into the spacer.
This little trick pushes the mounting surface out from the wall just enough to clear the baseboard, letting your headboard hang perfectly straight and secure.
Can I Attach a Headboard Without Using Studs?
Technically, you can for an extremely lightweight, purely decorative headboard, but we almost always advise against it. For true stability, you should always anchor into at least one stud.
If you have a feather-light headboard and absolutely can't hit a stud, your only option is to use heavy-duty drywall anchors rated for at least double your headboard's weight.
But let’s be clear: for any headboard with real substance, relying on drywall alone is a safety risk. The most secure, long-lasting method is always to fasten your hardware directly into the wall studs. They provide the structural support needed to ensure your headboard stays put for years to come.
Feeling ready to kick off your bedroom refresh? Miller Waldrop Furniture & Decor is here to help you create a space you truly love. From finding the perfect headboard to offering expert design advice, we’ve got your back.
Let's build your dream bedroom together. Explore our curated collections at https://www.millerwaldrop.com.